

OneDrive in Windows 10
Microsoft includes its OneDrive cloud-storage service along with Windows 10. After you upgrade to Windows 10 or run it for the first time on a new machine, you'll get a notification that it's available. Click the notification to begin the setup process. If you don't want to use OneDrive, dismiss the notification. If you later want to set it up, look for the OneDrive icon on the taskbar and click it. If you don't see the icon, type "OneDrive" into Cortana's search box and you'll be able to set it up.
Before using OneDrive, you should know the lay of the land. OneDrive lives in the cloud, but you can choose to sync its files and folders to your local PC. So you'll have a choice to sync all of your existing OneDrive files and folders to your Windows 10 PC, or just some of them. Syncing happens automatically, without you having to do anything.
In Windows 10, you get to your OneDrive via File Explorer. By default, this shows you OneDrive files and folders that live on your PC — those that you've chosen to sync. If you instead want to see OneDrive in the cloud, go to www.onedrive.com. Alternatively, a new feature in the Windows 10 Fall Creators Update lets you see and access all your OneDrive files, even those stored in the cloud, from File Explorer. I’ll explain how to use that feature, called OneDrive Files On-Demand, below.
 Preston Gralla / IDG
OneDrive in Windows 10 with One Drive Files On-Demand enabled. Icons next to files show which are local, which are in the cloud and which are syncing. (Click image to enlarge it.)
With all that in mind, let's go back to setup. When you first set up OneDrive, you'll be asked whether you want to sync your entire cloud-based OneDrive to your local PC, or only individual folders. If you choose individual folders, you'll be able to pick and choose which to sync.
You're not stuck with that decision forever, though. Let's say that you've chosen only to sync some folders, and later on you decide you want to change them — add some folders to sync and remove others. You can get to this setting in a couple different ways:
- Launch OneDrive by double-clicking its icon (it looks like clouds) on the right side of the taskbar, or else by opening File Explorer and navigating to it. Right-click a file or folder and select "Choose OneDrive folders to sync."
- Right-click the OneDrive icon in the taskbar, select Settings, go to the Account tab, and click "Choose folders."
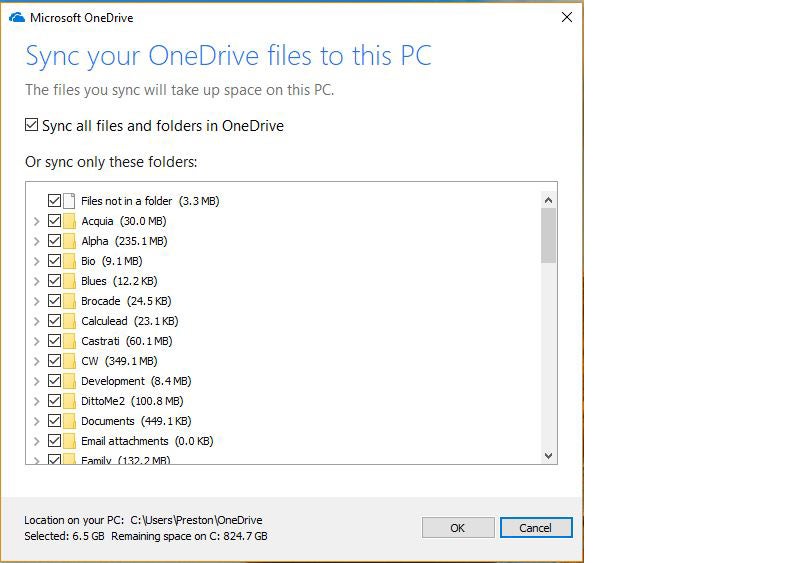
Either way, a screen appears. If you want to sync all folders, check the box next to "Sync all files and folders in OneDrive." If you instead want to sync only some of them, uncheck that box, then check the boxes of those folders you want to sync and uncheck the boxes of those you don't want to sync.
 Preston Gralla / IDG
You can choose which folders to sync in OneDrive. (Click image to enlarge it.)
A word of advice about using OneDrive: I suggest that if you're going to use it as your primary local and cloud storage that you rethink your folder structure. Over the years, Microsoft has nudged or pushed you into using various folder structures, such as organizing everything in Documents, or in Libraries. That's problematic with OneDrive, because if you do that, you won't be able to easily sync them with OneDrive.
So if you become serious about OneDrive, I recommend organizing everything under your OneDrive folder. That way, when you create new files and folders on your PC, they'll automatically sync up to the cloud.
Using OneDrive Files On-Demand
Introduced with the Windows 10 Fall Creators Update in October of 2017, OneDrive Files On-Demand is great for people who have multiple PCs and laptops, because it gives you access to all of your OneDrive files on every device, without having to download them first.
Turning on One Drive Files On-Demand makes it easier to save space on local hard drives while still giving you access to all the files you need. That way you can buy a less expensive laptop with less storage than you would normally need, because it’s easy to access all of your OneDrive files, even with a modest amount of local storage.
To use it, first make sure it’s turned on: Click the OneDrive icon on the right side of the taskbar, click the three buttons on the right side of the screen that appears, select Settings, click the Settings tab from the screen that appears and check the box next to “Save space and download files as you use them.”
When you do that, you’ll see all of the files you have stored in OneDrive, whether they’re on your PC or not. Icons next to each file or folder indicate whether it is stored only on the web (the cloud icon) or on your PC as well (the checked circle icon).
If you double-click a file in File Explorer that’s on your PC or in both locations, you open it from your PC. If you double-click one that’s only online, it gets downloaded to your PC, and you work on it locally. From that point on, it’s available on both your PC and OneDrive and syncs to both.
You can easily change the status of any file or folder from local to cloud storage or vice versa. To do it, right-click the file or folder. Then select “Always keep on this device” if you want to download the file or folder to your PC, or select “Free up space” if you want to remove it from your PC to get more storage space but still keep it in OneDrive on the web.
This works in applications as well as in File Explorer. So files from OneDrive on the web show up in Microsoft Office, and when you open them, they get downloaded for use on your PC.
Settings and preferences
In Windows 8, when you wanted to change your settings, you had to look in multiple places and hope you found what you wanted. Windows 10 makes your life easier. Most settings, and particularly the most important ones, are found in the Settings app.
Get to it by clicking the Start button, then clicking Settings. You can also get to it from the Action Center by clicking the "All settings" quick action icon.
 Microsoft
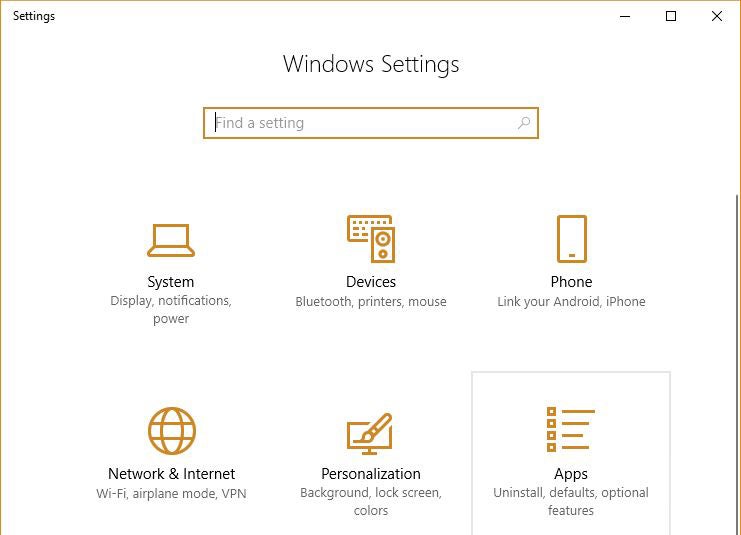
The Settings app is the control center for all your system settings. (Click image to enlarge it.)
The Settings app has 13 sections: System, Devices, Phone, Network & Internet, Personalization, Apps, Accounts, Time & Language, Gaming, Ease of Access, Cortana, Privacy and Update & Security. It's straightforward to use: Click on an icon and navigate to what you need. If you want to get to a specific setting fast, type into the app's search bar, then click a setting that matches your search — for instance, to turn autocorrect off or on, you can type "autocorrect" in the search bar, select "Autocorrect misspelled words" and drag the toggle switch to the setting you want.
That's not to say that you'll find everything in the Settings app. If you're looking for something that only a tinkerer might want to change, you might find it instead in Control Panel. So, for example, if you want to assign your PC a static IP address, have your system display files that are normally hidden or access similar techie settings, Control Panel is the place to go.
You can get there by typing "control panel" in the Settings app's search bar and selecting Control Panel. Here you can navigate through the groups or search for your task; for instance, typing "hidden" in the Control Panel's search bar turns up "File Explorer Options: Show hidden files and folders."
Security settings
In Windows 10, all of your most important security settings are found in a single location, the Windows Defender Security Center. Get to it by typing Windows Defender Security Center in the search box and clicking the icon when it appears, or by choosing it from All Apps.
From here you can change all your important security settings. You likely won’t need to do that, though, because the default Windows settings are solid. However, if you’re looking for advanced customization options, such as letting apps through the built-in firewall (get to this setting from the “Firewall & network protection” section), here’s where to go.
And if you’re worried about ransomware, you can turn on an anti-ransomware capability called Controlled Folder Access, in which only approved apps can get access to Windows system files and data folders. This was first introduced in the Windows 10 Fall Creators Update.
To turn it on, in the Windows Defender Security Center select “Virus & threat protection” and click on “Virus & threat protection settings.” One note about this: Before you click on that setting, you’ll see a note underneath it that says, “No action needed.” Click it anyway. That’s the only way to get to Controlled Folder Access.
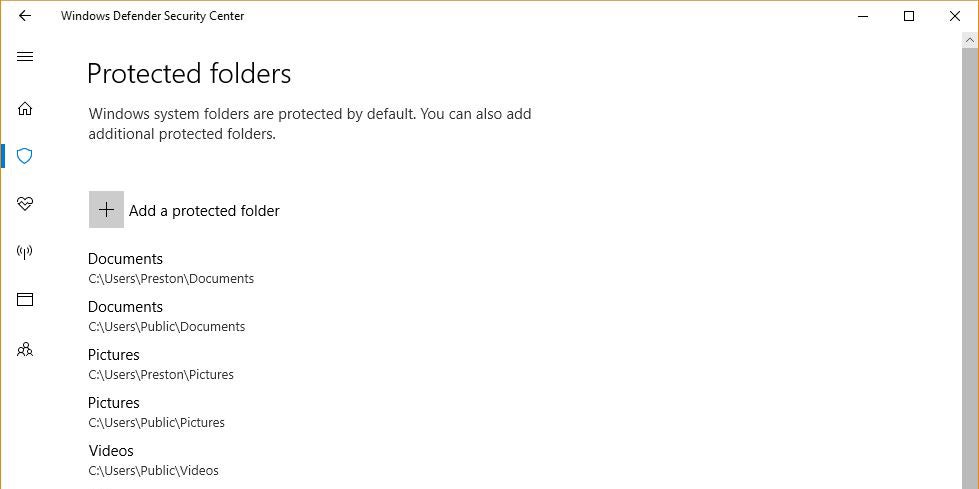
After you click, scroll down to “Controlled folder access” from the screen that appears and move the slider to On. When you do that, you’ll also be able to customize how it works, including changing which folders should be protected and which apps should be allowed to access them. Click “Protected folders” to add a folder you want protected. (Note: You can’t remove the ones that Microsoft protects by default.)
 Preston Gralla / IDG
Controlled Folder Access protects against ransomware by only allowing vetted apps to access important folders.
If you instead want to add an app that can access the folders, click “Allow an app through Controlled folder access,” then click “Add an allowed app.” You’ll have to know the location of the executable file that runs the app. Navigate to the file, select it, and it will be allowed through.
Handy touchpad gestures, keyboard shortcuts and touchscreen gestures
Windows 10 supports a variety of keyboard shortcuts as well as gestures for touch-based devices. Try them out a few times, and before long they'll become second nature.
First, let's look at touchpad gestures. Touchpads are standard equipment on laptops these days, and for everyday computing a modern touchpad can do everything a mouse can, and more. (Note, however, that if you have an older machine, some or all of these gestures might not work.)
Next up are the most useful keyboard shortcuts — get to know these and you'll save oodles of time as you zip around Windows 10 without taking your hands off the keys.
Finally, if you're working on a tablet or a touchscreen PC, here's how to get around.