Word 2016 cheat sheet
- 08 January, 2018 22:00

Word has always been the workhorse app of the Microsoft Office suite, and Word 2016 is no different than past versions. Nearly everyone who uses Office ends up using Word at some point, whether it be for writing memos, typing up agendas, creating reports, crafting business correspondence or any of a thousand other uses.
The current version, Word 2016, was released in late 2015 when the entire Office suite was upgraded, and by now many businesses have moved to it. But although you may have upgraded to the latest version, you might be missing out on some worthwhile features introduced in Word 2016 for Windows -- that’s what we’ll look at in this story.
Your copy of Word 2016 may be part of the standalone Office software suite or part of an Office 365 subscription for business, home, or education. But that doesn't matter; except as noted below, all the tips here apply to whatever version of Word 2016 you're using.
Share this story: IT pros, we hope you’ll pass this guide on to your users to explain the Word 2016 ropes.
Use the Ribbon
The Ribbon interface in Word 2016 hasn’t changed much compared to earlier versions. The Ribbon has been included in Office suite applications since Office 2007, so you’re probably familiar with how it works. But if you need a refresher, see our Word 2010 cheat sheet.
Just as in Word 2013, the Ribbon in Word 2016 is flatter-looking, cleaner and less cluttered than the one in Word 2010 and 2007. The 2016 Ribbon is smaller than in Word 2013, the title bar is now solid blue rather than the previous white, and the menu text (File, Home, Insert and so on) is now a mix of upper- and lowercase rather than all caps. There are other minor changes as well — for instance, the old Page Layout tab is now called just Layout — but the Ribbon still works in the same way and you'll find most of the commands in the same locations as in Word 2013.
 Preston Gralla / IDG
The Ribbon in Word 2016 is smaller than in Word 2013 and is solid blue rather than white. (Click image to enlarge it.)
To find out which commands live on which tabs on the Ribbon, download our Word 2016 Ribbon quick reference. Also see the nifty new Tell Me feature described below.
Just as in earlier versions of Word, to make the commands underneath the tabs on the Ribbon go away, press Ctrl-F1. To make the commands appear again, press Ctrl-F1. (Note that the Ribbon tabs — File, Home, Insert and so on — stay visible.)
 Preston Gralla / IDG
Here are the Ribbon display options.
You’ve got other options for displaying the Ribbon as well. To get to them, click the Ribbon display options icon at the top right of the screen, just to the left of the icons for minimizing and maximizing Word. A drop-down menu appears with these three options:
- Auto-hide Ribbon: This hides the entire Ribbon, both the tabs and commands underneath them. To show the Ribbon again, click at the top of Word.
- Show Tabs: This shows the tabs but hides the commands underneath them. It’s the same as pressing Ctrl-F1. To display the commands underneath the tabs when they’re hidden, press Ctrl-F1, click a tab, or click the Ribbon display icon and select “Show Tabs and Commands.”
- Show Tabs and Commands: Selecting this shows both the tabs and commands.
And if for some reason that blue on the title bar is too much color for you, you can turn it white, gray or black. To do it, select File > Options > General. In the "Personalize your copy of Microsoft Office" section, click the down arrow next to Office Theme and select Dark Gray, Black or White from the drop-down menu. To make the title bar blue again, choose the Colorful option from the drop-down list. Just above the Office Theme menu is an Office Background drop-down menu — here you can choose to display a pattern such as a circuit board or circles and stripes in the title bar.
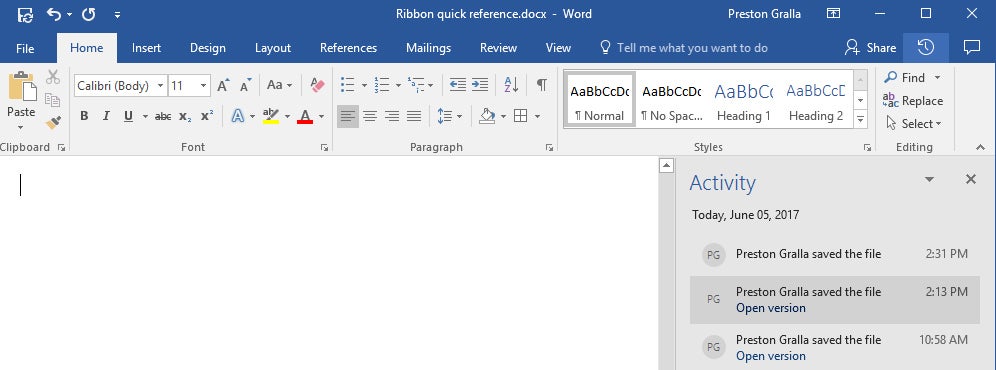
If you're working on a document you've saved in OneDrive or SharePoint, a new button appears on the Ribbon, just to the right of the Share button. It's the Activity button, and it's particularly handy for shared documents. Click it and you'll see the history of what's been done to the document, notably who has saved it and when. To see a previous version, click the "Open version" link underneath when someone has saved it, and the older version will appear.
 Preston Gralla / IDG
The Activity pane shows who's done what to a shared document. (Click image to enlarge it.)
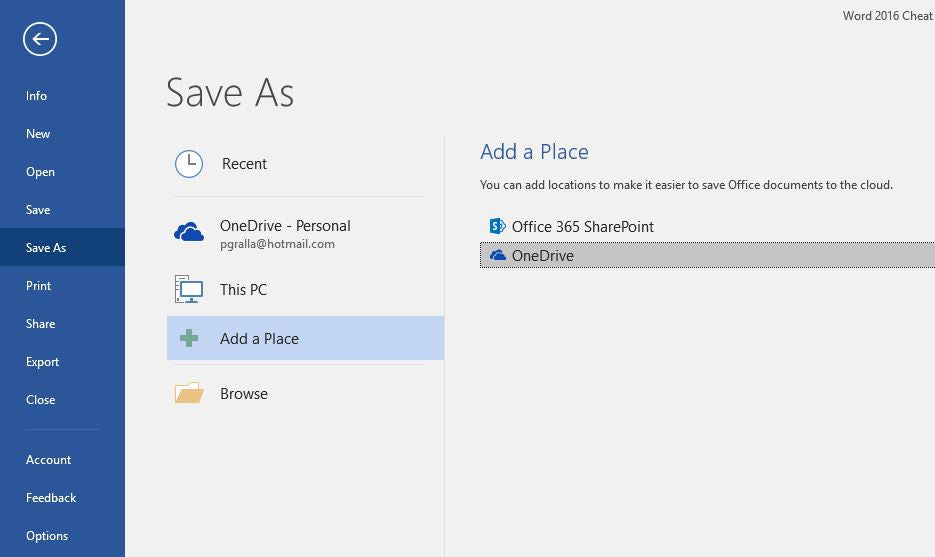
There’s also useful change in what Microsoft calls the backstage area that appears when you click File on the Ribbon: If you click Open or Save As from the menu on the left, you can see the cloud-based services you've connected to your Office account, such as SharePoint and OneDrive. Each location now displays its associated email address underneath it. This is quite helpful if you use a cloud service with more than one account, such as if you have one OneDrive account for personal use and another one for business. You'll be able to see at a glance which is which.
 Preston Gralla / IDG
Select “Add a Place” to add a new cloud storage service for Word. (Click image to enlarge it.)
Collaborate in real time
The biggest feature that’s new in Word 2016 is real-time collaboration that lets people work on documents together from anywhere in the world with an Internet connection, a feature that Google Docs has long had. There are only two requirements for collaboration in Word 2016: You must be logged into your Microsoft or Office 365 account, and the document must be stored in OneDrive, OneDrive for Business or SharePoint Online.
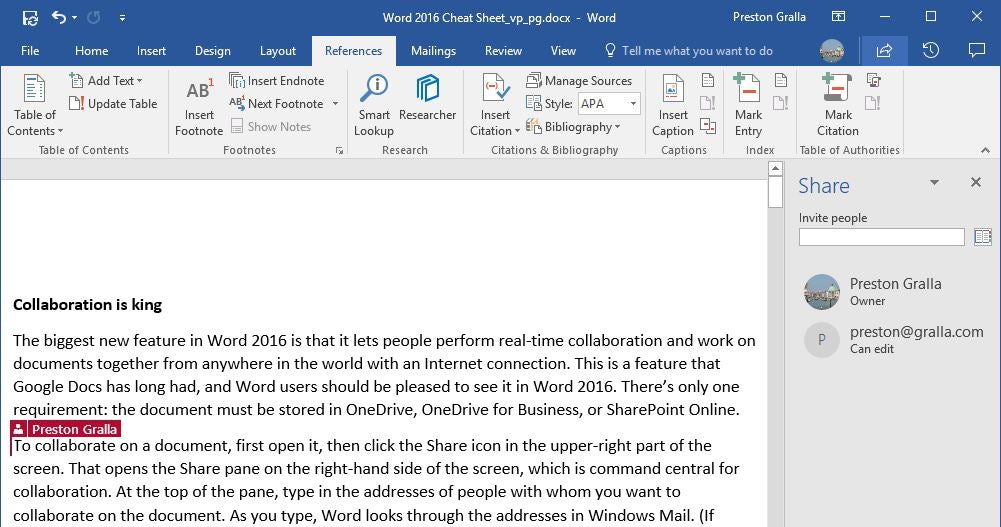
To collaborate on a document, first open it, then click the Share icon in the upper-right part of the screen. If you haven’t yet saved your file in OneDrive, OneDrive for Business or SharePoint Online, you’ll be prompted to do so. What happens next depends on whether your document is stored in your own OneDrive or with OneDrive for Business or SharePoint Online.
When Word 2016 for Windows was first launched, all document sharing was done via the Share pane. In May 2017, Microsoft rolled out a new sharing interface to enterprise Office 365 users — i.e., those who store their files in OneDrive for Business or SharePoint Online — that it says is simpler and gives greater control over who has access to your content. A Microsoft representative told us that the company intends to roll out the newer interface to consumers with an Office 365 subscription at some point, but it hasn’t announced timing yet. And the new interface isn’t planned for non-subscription versions of Office 2016 or earlier. So we’ll give instructions for both interfaces below.
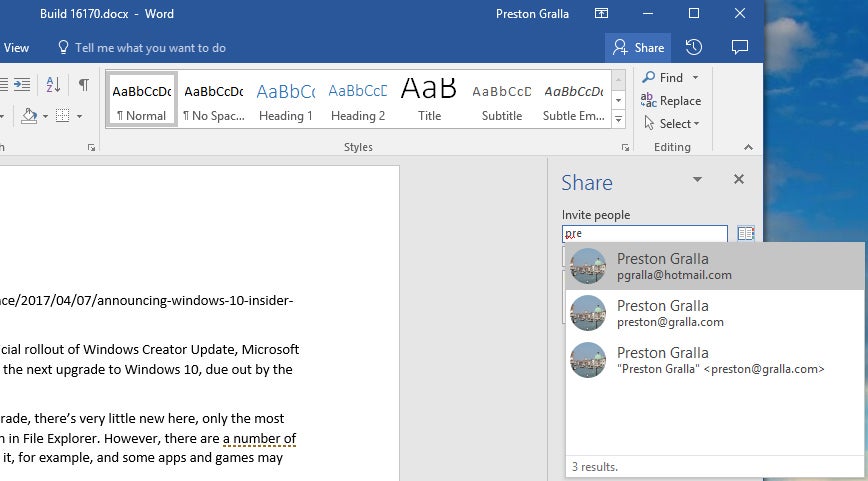
If your document is stored in your personal OneDrive: After you’ve saved the document to OneDrive and clicked the Share button, the Share pane will open on the right-hand side of the screen — this is command central for collaboration. At the top of the pane, type in the email addresses of the people with whom you want to collaborate on the document, separated by commas. As you type, Word looks through your address book and displays the matches it finds; click the person you want to invite. If you’re on a corporate network, you can click the address book on the right to search through your corporate email address book. If a person isn’t in your address book — just type in their complete email address.
 Preston Gralla / IDG
Selecting people with whom to collaborate via the Share pane.
After you enter the addresses, select either "Can edit" or "Can view" in the drop-down to allow collaborators full editing or read-only privileges. (If you want to assign different rights to different users, you can send two separate emails, or you can change any collaborator’s permissions later by right-clicking their name in the Share pane.) Type a message in the text box if you want. When you’re done, click Share. An email gets sent out to everyone with whom you’ve shared the file, showing a “View in OneDrive” button that they can click to open the document.
 Preston Gralla / IDG
Your collaborators get an email message like this when you share a document.
There’s another way to share a file stored in a personal OneDrive for collaboration: At the bottom of the Share pane, click “Get a sharing link,” and from the screen that appears, choose “Create an edit link” if you want to create a link to the file that will allow people to edit the file, or “Create a view-only link” if you want to create a link that will allow them to view the file only. Then create an email using any email program, copy the link and send it.
If you want to instead send the file but don’t want to let people collaborate on it, at the bottom of the Share pane click “Send as attachment.” You can then send the file either in Word format or else as a PDF. When you do this, it won’t reflect any changes you make to it after you send the file.
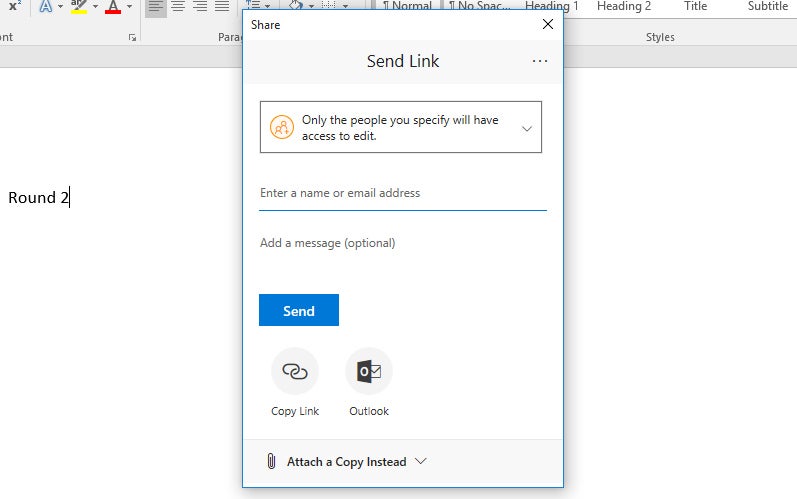
If your document is stored in SharePoint Online or OneDrive for Business: Clicking the Share button pops up a Send Link window. Here you can send an email with a link where others can access the document.
 Valerie Potter / IDG
Sharing a document via the Send Link pane.
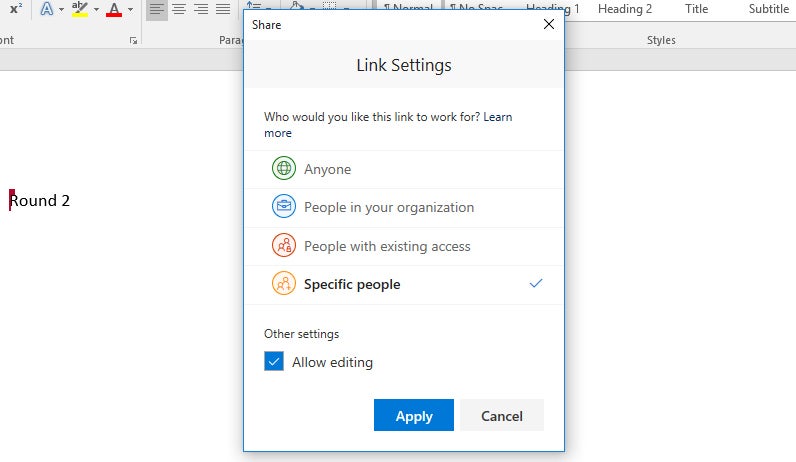
By default, only the people whose email addresses you enter will be able to edit the document, but you can click the permission box to expand access to anyone who already has access to the file, anyone in your organization, or anyone at all. (You can uncheck the “Allow editing” box to set any of those permissions to read only.)
 Valerie Potter / IDG
Enterprise users can fine-tune access and editing permissions for their shared document here.
Back in the main Send Link window, enter the recipients’ email addresses (as you type, Word will suggest people from your address book whom you can select), optionally type in a message, and click Send. An email is sent to all the recipients with a link they can click to open the document.
To begin collaborating: Whether the email recipients get is associated with a personal or business OneDrive account, they click a button or link to open the document, which opens in Word Online in a web browser rather than in the Word desktop client. In order to collaborate, they’ll need to click the Edit Document button at the top of the screen. From the drop-down list, they can then choose to open the file either in the client version of Word, or in the free web version. The web version isn’t as fully featured as the client version — for instance, there aren’t as many formatting options and you can’t insert shapes, take screenshots, use mail merge, or use several other features. But for basic editing, it works fine.
You’ll get a notification that someone else is editing the document, and you’re asked whether you want to share changes as they happen. So does the person to whom you’ve sent the document if they open it while you’re in it. Click Yes to share the changes.
 Preston Gralla / IDG
You’ll get this notification when someone wants to collaborate on a document.
When you're working on a document with other people in real time, each person gets a cursor with their own unique color. You can see what they do as they do it, including deleting, editing and adding text. They see what you do as well.
You can do more than see each other’s work. You can communicate with them as well. The Share pane shows a list of people who have editing access to the document. Those who are currently in the document have a colored bar next to their icon. That bar matches the color of the cursor you'll see as they move around in the document.
 Preston Gralla / IDG
Here’s what Word looks like when two people are collaborating on a document.
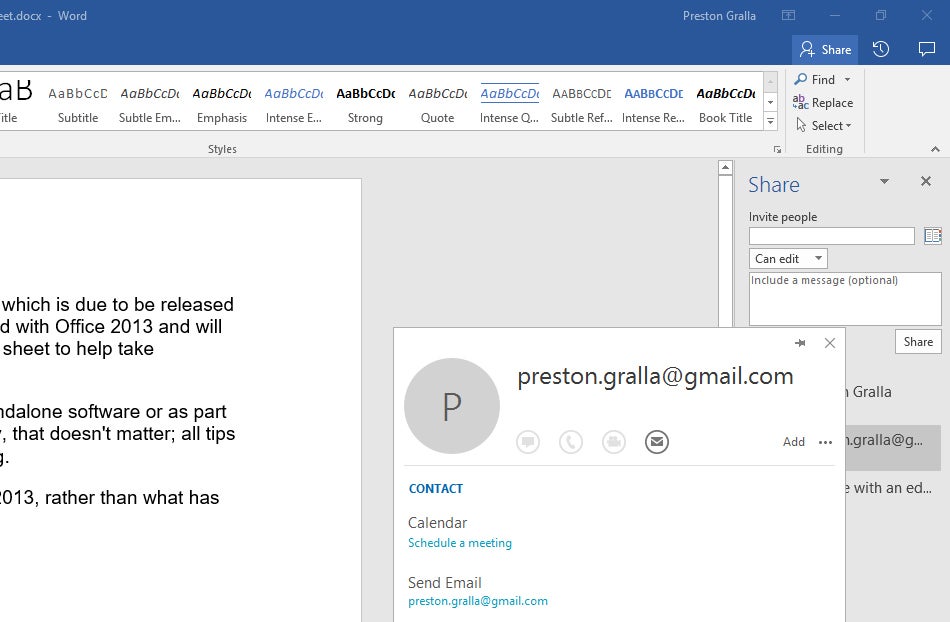
Click the icon of anyone currently working on the document and a screen pops out with the various ways you can contact them, including chat, phone and video via Skype (if they have Skype) and email. That lets you talk or text with them while you're working on the document together, making collaboration that much more effective.
 Preston Gralla / IDG
Click the icon of someone working with you on a document to see other ways you can contact them.
Be aware that how well real-time collaboration works depends on the strength of your internet connection. On slow or flaky connections, you won’t immediately see edits that other people make and they won’t see yours immediately — there will be a lag. So it’s always best, when possible, to have the strongest connection possible when collaborating.
Tackle tasks with Tell Me
Although collaboration is the biggest addition to Word 2016, there are several other new features as well. A very useful one is Tell Me, which is extremely helpful when you want to do a task that you haven’t done before or have forgotten how to do.
It’s a text box just to the right of the Ribbon tab labels at the top of the screen with the words “Tell me what you want to do” in it. Type in a task, and you’ll get a list of possible matches. Click the task you want to get instructions on how to do it.
For example, I typed “address an envelope” and chose the “Envelope” result, and the screen you use for addressing envelopes appeared. When I typed in the more general query “write an essay,” it popped up a link to Word’s Researcher feature that lets you do research from right within Word, add sources from the research you find, and then cite the sources in the document properly. If you type in a query and hover your mouse over a result instead of clicking it, you’ll see a screen describing what you can do if you click the results.
 Preston Gralla / IDG
Tell Me gives advice on addressing an envelope (or any other task). (Click image to enlarge it.)
It’s a big time-saver, because you don’t have to hunt through the Ribbon to find the command you want. And it remembers the features you've previously selected in the box, so when you click in it, you first see a list of previous tasks you've searched for. That way, tasks that you frequently perform are always within easy reach.
Page Break
Use Smart Lookup for quick online research
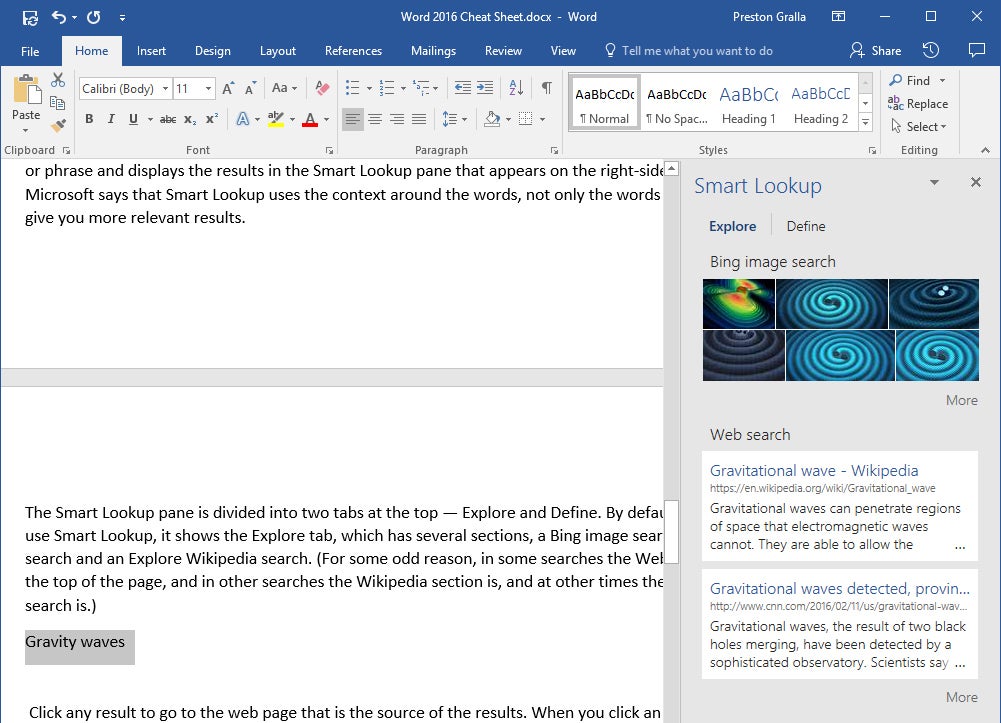
Several new features help you do research or fact-checking when working on a document. The more useful for most people is Smart Lookup. Right-click a word, or highlight a group of words and right-click them, and from the menu that appears select Smart Lookup. Word then uses Microsoft’s Bing search engine to do a search on the word or phrase and displays the results in the Smart Lookup pane that appears on the right side of the screen. Microsoft says that Smart Lookup uses the context around the words, not only the words themselves, to give you more relevant results.
The Smart Lookup pane is divided into two tabs at the top — Explore and Define. By default, when you use Smart Lookup, it shows the Explore tab, which includes a Bing image search, a web search and an Explore Wikipedia search. (For some odd reason, in some searches the web search is at the top of the page, in other searches the Wikipedia section is, and at other times the Bing Image search is.)
 Preston Gralla / IDG
The results of a Smart Lookup for gravity waves. (Click image to enlarge it.)
Click any result to go to the web page that is the source of the results. When you click an image in Bing image search, you’re not sent to the individual image, but instead to a page full of the results of the Bing image search. However, the image that you click will be the first image on the page.
In the web search, the first result is often a Wikipedia entry, followed by a variety of other results. For example, when I did a search on “coal mining,” the Wikipedia entry was first, followed by information from the World Coal Association. Similarly, when I searched for “gravity waves” the first two results were from Wikipedia, one for “Gravitational wave” and other for “gravity waves.” In instances like this in which there’s more than one Wikipedia entry, Wikipedia gets its own section in the Smart Lookup pane, followed by web search. Each of the sections in the Explore tab has a More link underneath the results. Click it to see additional results.
If you’re not pleased with the results of a search, I suggest doing the search again, because you might get different results. I did the coal mining search twice; once it returned one result from Wikipedia, and another time it turned multiple results (one for coal mining and another for “History of coal mining.”).
As for the Define tab, the result is simple and straightforward: a definition of the word or term from the Oxford Dictionaries from Oxford University Press. Don’t bother clicking the definition; it doesn’t link out to the web.
Use Researcher for in-depth research
Academics, students and those wanting to do in-depth research will welcome the new Researcher tool. Unlike Smart Lookup, Researcher doesn’t feed you information straight from the web via Bing. Instead, Researcher taps into reference materials and sources it considers trustworthy, compiled by a service called Microsoft Academic Search, so you’re getting a search that should be more reliable and in-depth than Smart Lookup. It also includes results from Wikipedia and Bing that it considers trustworthy.
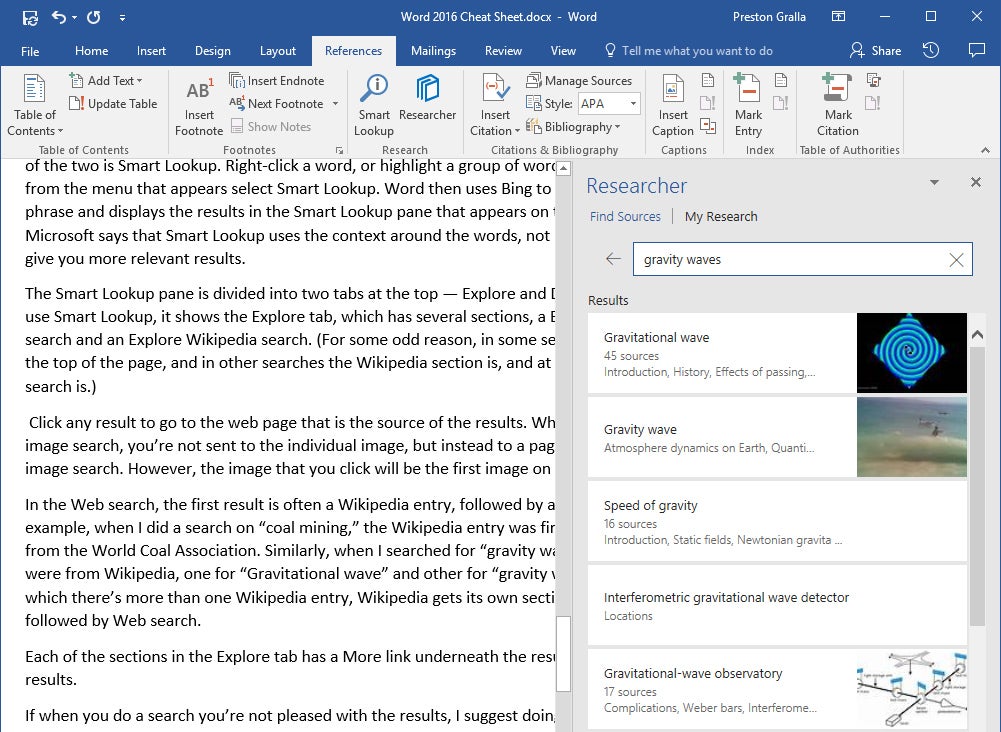
To use it, select References > Researcher in the Ribbon. The Researcher pane appears on the right side of the screen. Type your search term into the text box at the top of the screen, and you’ll see a list of results that are far more finely honed than you get when using Smart Lookup. For example, when I searched for “gravity waves,” I was given a variety of results including gravitational wave, gravity wave, speed of gravity, interferometric gravitational wave detector, Rossby-gravity waves and many others.
 Preston Gralla / IDG
Researcher offers more granular, in-depth information than Smart Lookup. (Click image to enlarge it.)
Click any result and you’ll come to a page full of results from multiple sources. Clicking “Gravitational-wave astronomy,” for example, leads to results from 33 sources as diverse as the Physical Review Letters journal, a book from Cambridge University Press, an article from The New York Times, information from Wikipedia and many others. Click any source and the information will be delivered directly on the Researcher pane, although you may find some instances in which the links are outdated and dead. Also in some instances, only part of the information from the source will be on the pane. To get to the rest of it, click a link.
Researcher can integrate much of its information directly into Word. So, for example, if you want to turn a category of results into a heading in your paper (in my example, I chose Rossby-gravity waves), click “Add heading” in the results, and the heading gets added into your current Word document. In addition, a comment is added to the document that includes a link that when clicked will display the original research in the Researcher pane for anyone with Word 2016 for Windows who reads the document.
You can also add a citation directly from the Researcher pane into your document. Click the + sign near the information, and Researcher adds the citation at the current location of your cursor. You can edit the citation in your document by clicking the small arrow to its right. You can also add text from the Researcher pane, or add text and include a citation. To do it, select the text you want to add, and from the menu that appears, select either Add or Add and Cite.
Finally, at right top of the Researcher pane you’ll find a My Research tab. Click it, and it displays all of the topics that you’ve clicked on so you can easily return to them.
Add new types of charts
With Word 2016 (as well as Excel 2016 and PowerPoint 2016), you get six new types of charts you can add to documents: Treemap, Sunburst, Waterfall, Histogram, Pareto, and Box & Whisker. Each provides a unique way to display data visually. See our Excel 2016 cheat sheet for details about the new chart types, including what each one looks like and what type of data it’s best suited for.
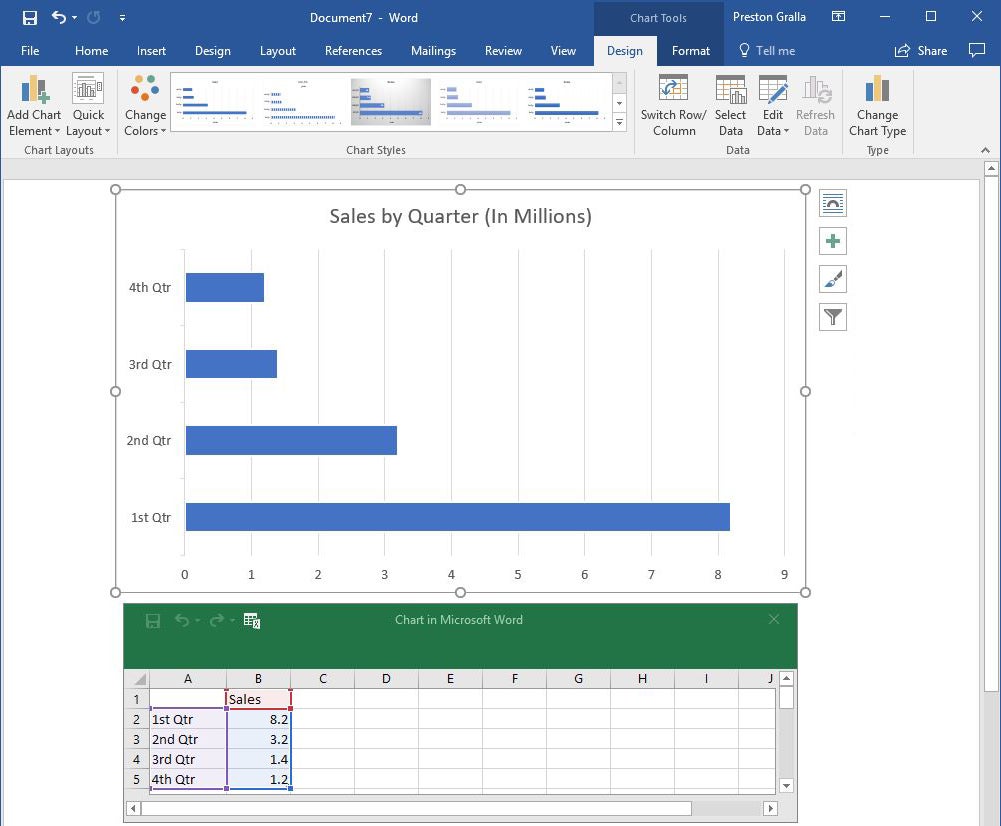
To insert any of the new chart types (or any other chart) in a document, select Insert > Chart and then choose the type of chart to insert. When you do that, the chart appears in your document with placeholder data, and a pop-up window appears that looks like a mini Excel spreadsheet. Enter or edit the data, or else click the Edit in Excel button to open it up in Excel and edit it there.
 Preston Gralla / IDG
When you insert a chart, a window where you can edit the data pops up. (Click image to enlarge it.)
Note that the Pareto chart does not show up when you select Insert > Chart. To insert one, you’ll have to first create the data you want to chart by inserting a table (Insert > Table) and then entering the data in the table. After that, select Insert > Chart, select Histogram, and at the top of the screen that appears, select the option to the right, Pareto.
Handy keyboard shortcuts
Using keyboard shortcuts is one of the best ways to accomplish tasks quickly in Word 2016. You can even use them to navigate the Ribbon. For instance, Alt-H takes you to the Home tab, and Alt-G takes you to the Design tab. (For help finding specific commands on the Ribbon, see our Word 2016 Ribbon quick reference.)
 Preston Gralla / IDG
Using the Alt key helps you master the Ribbon shortcuts. (Click image to enlarge it.)
But there are many other keyboard shortcuts to help you accomplish a vast array of tasks in Word 2016. We've listed the ones we've found the most useful below. For even more shortcuts, see Microsoft's Office site.
Useful Word 2016 keyboard shortcuts
Don't forget to download our Word 2016 Ribbon quick reference!