PowerPoint 2016 cheat sheet
- 11 October, 2018 21:00
Need to create and share a presentation? If so, you probably turn to the most popular presentation application in the world, Microsoft PowerPoint for Windows. Although Microsoft has just announced the availability of Office 2019 to commercial users, many businesses will stick with Office 2016 (and thus PowerPoint 2016) for some time to come — especially because the company is now saying that Office 2016 users can connect to Microsoft’s online services until 2023.
Although you might have been using PowerPoint 2016 for some time now, you might be missing out on some of its worthwhile features. In this story, we’ll clue you in on the most important features introduced in PowerPoint 2016 for Windows.
Your copy of PowerPoint 2016 may have been purchased as standalone software or as part of an Office 365 subscription. The subscription version gets continually updated, while the standalone version (which Microsoft calls the perpetual version) stays static. But fear not, we’ve got help for whichever version you use. The first part of the article covers features available in both versions, while the later sections focus on features available only to Office 365 subscribers. Then we wrap things up with a list of handy keyboard shortcuts for all PowerPoint 2016 users.
Share this story: IT folks, we hope you'll pass this guide on to your users to help them learn to get the most from PowerPoint 2016.
Use the Ribbon
The Ribbon interface that you came to know and love (or perhaps hate) in earlier versions of PowerPoint hasn't changed much in PowerPoint 2016. Because the Ribbon has been included in Office suite applications since Office 2007, we assume you're familiar with how it works. If you need a refresher, see our PowerPoint 2010 cheat sheet.
As in PowerPoint 2013, the Ribbon in PowerPoint 2016 has a flattened look that's cleaner and less cluttered than in PowerPoint 2010 and 2007. The 2016 Ribbon is smaller than it was in PowerPoint 2013, the title bar now is now red rather than the previous white, and the text for the Ribbon tabs (File, Home, Insert and so on) is now a mix of upper- and lowercase rather than all caps. But it still works in the same way, and you'll find most of the commands in the same locations as in PowerPoint 2013.
 IDG
IDG
The Ribbon hasn't changed a great deal from PowerPoint 2013. (Click any image in this story to enlarge it.)
To find out which commands live on which tabs on the Ribbon, download our PowerPoint 2016 Ribbon quick reference. Also see the nifty new Tell Me feature described below.
As in previous versions of PowerPoint, if you want the Ribbon commands to go away, press Ctrl-F1. (Note that the tabs above the Ribbon — File, Home, Insert and so on — stay visible.) To make them appear again, press Ctrl-F1.
You’ve got other options for displaying the Ribbon as well. To get to them, click the Ribbon Display Options icon at the top right of the screen, just to the left of the icons for minimizing and maximizing PowerPoint. A dropdown menu appears with these three options:
- Auto-hide Ribbon: This hides the entire Ribbon, both the tabs and commands underneath them. To show the Ribbon again, click at the top of PowerPoint.
- Show Tabs: This shows the tabs but hides the commands underneath them. It’s the same as pressing Ctrl-F1. To display the commands underneath the tabs when they’re hidden, press Ctrl-F1, click a tab, or click the Ribbon display icon and select “Show Tabs and Commands.”
- Show Tabs and Commands: Selecting this shows both the tabs and commands.
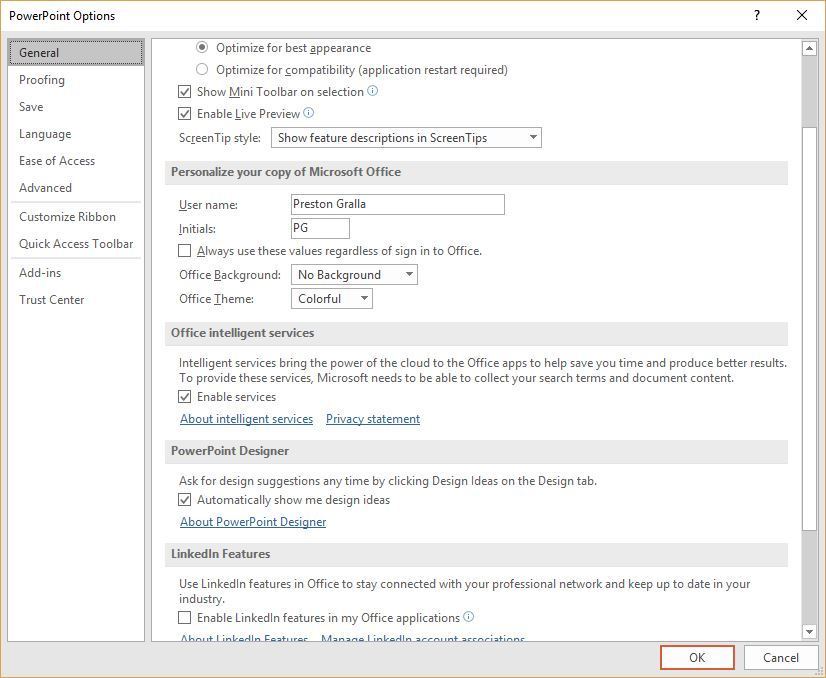
And if for some reason that nice red color on the title bar is just too much for you, you can turn it white, gray or black. To do it, select File > Options > General. In the "Personalize your copy of Microsoft Office" section, click the down arrow next to Office Theme, and select Dark Gray, Black or White from the dropdown menu. To make the title bar red again, instead choose the "Colorful" option from the dropdown list. Just above the Office Theme menu is an Office Background dropdown menu — here you can choose to display a pattern such as a circuit board or circles and stripes in the title bar.
 IDG
IDG
You can change PowerPoint’s red title bar to gray, black or white: In the "Personalize your copy of Microsoft Office" section, click the down arrow next to Office Theme and pick a color.
If you're working in a presentation you've saved in OneDrive or SharePoint, you'll see a new button on the Ribbon, just to the right of the Share button. It's the Activity button, and it's particularly handy for shared presentations. Click it and you'll see the history of what's been done to the presentation, notably who has saved it and when. To see a previous version, click the "Open version" link underneath when someone has saved it, and the older version will appear.
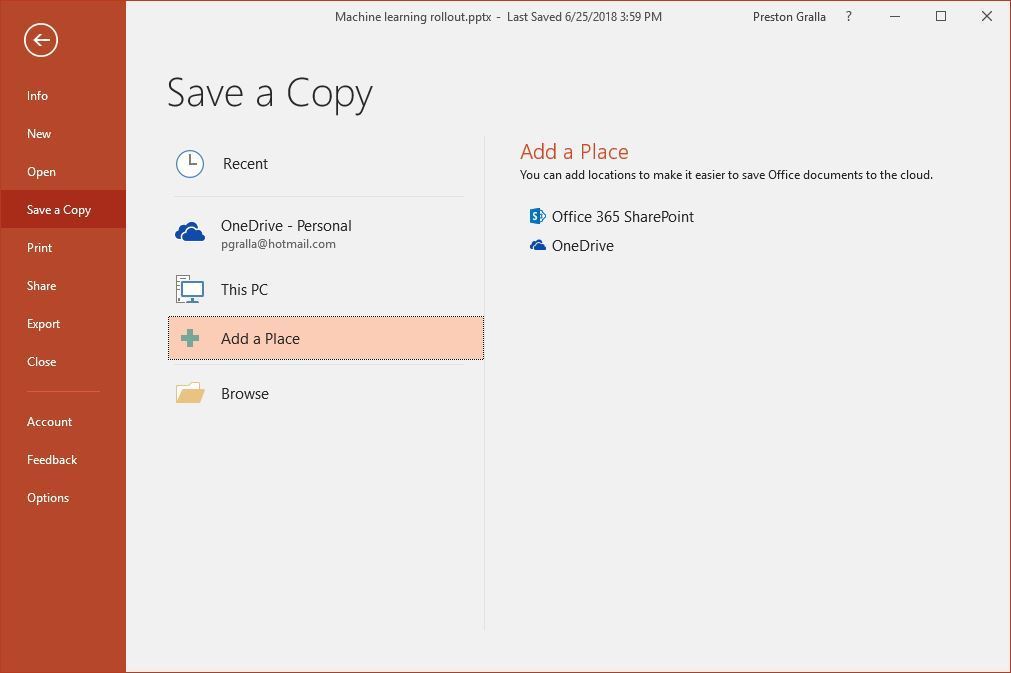
There’s also a very useful difference in what Microsoft calls the backstage area that appears when you click File on the Ribbon: If you click Open, Save a Copy, Save or Save As from the menu on the left, you can see the cloud-based services you've connected to your Office account, such as SharePoint and OneDrive. Each location now displays its associated email address underneath it. This is quite helpful if you use a cloud service with more than one account, such as if you have one OneDrive account for personal use and another one for business. You'll be able to see at a glance which is which.
You can also easily add new cloud-based services. From the screen that shows you your online locations, click “Add a Place,” and choose which service to add. Note, though, that you’re limited to SharePoint and OneDrive.
 IDG
IDG
The backstage area (under the File tab) shows which cloud-based services you've connected to your Office account and lets you connect to additional ones.
Use Tell Me to accomplish tasks quickly
PowerPoint is so chock-full of powerful features that it can be tough to remember where to find them all. PowerPoint 2016 has made it easier with a new feature called Tell Me, which puts even buried tools or those you rarely use in easy reach.
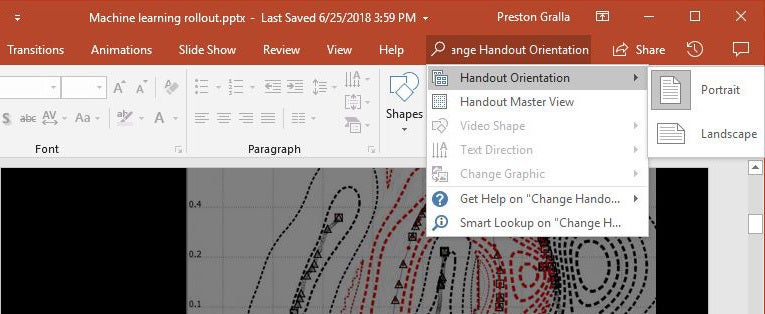
To use it, click the "Tell me what you want to do" text to the right of the Help tab on the Ribbon. (Those who prefer keyboard shortcuts can instead press Alt-Q.) Then type in a task you want to do, such as "change handout orientation." You'll get a menu showing potential matches for the task.
In this instance, the top result is a Handout Orientation listing that when clicked gives you two options — one to set the orientation to horizontal and the other to vertical. Just click the one you want to use. If you'd like more information about your task, the last two items that appear in the Tell Me menu let you select from related Help topics or search for your phrase using Smart Lookup. (More on Smart Lookup below.)
 IDG
IDG
PowerPoint 2016's Tell Me feature makes it easy to perform just about any task.
Even if you consider yourself a PowerPoint pro, give Tell Me a try. It'll save you lots of time and is much more efficient than hunting through the Ribbon to find a command. It also remembers the features you've previously clicked on in the box, so when you click in it, you first see a list of previous tasks you've searched for. That makes sure that tasks that you frequently perform are always within easy reach, while at the same time making tasks you rarely do easily accessible.
Try Smart Lookup for online research
If you do research to gather information for presentations, you’ll want to check out another new feature, Smart Lookup. It lets you do online research from right within PowerPoint while you're working on a presentation, so there’s no need to fire up your browser, search the web, and then copy the information to your presentation.
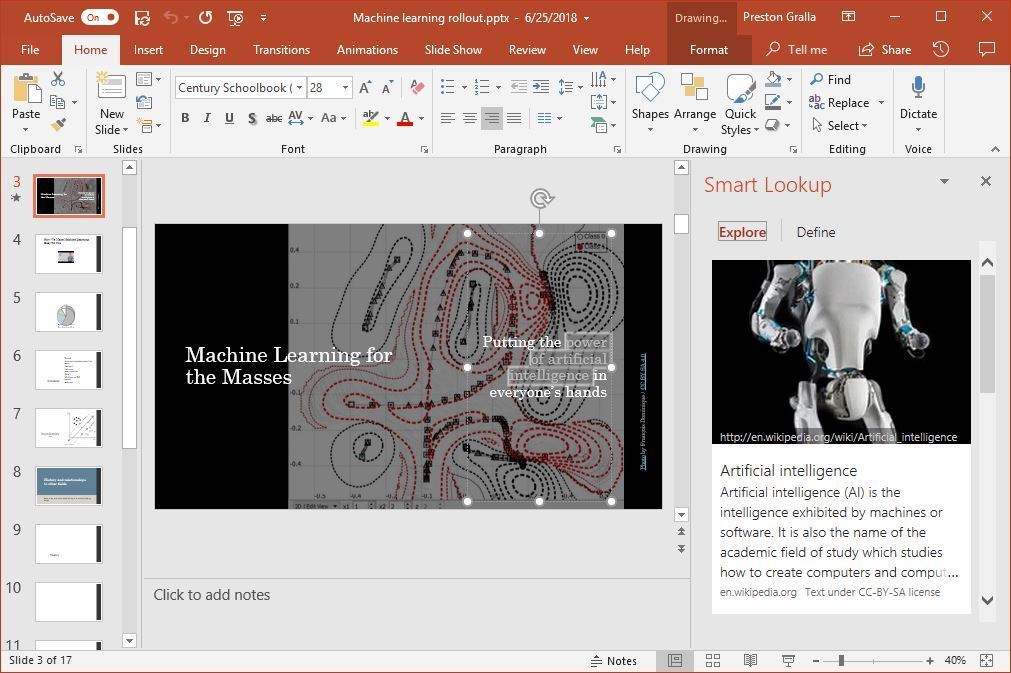
To use Smart Lookup, right-click a word or group of words and select Smart Lookup from the menu that appears. PowerPoint 2016 then uses Bing to do a web search on the word or phrase and displays definitions, any related Wikipedia entries, and other results from the web in the Smart Lookup pane that appears on the right. If you just want a definition of the word, click the Define tab in the pane.
 IDG
IDG
Smart Lookup lets you do web research from right within PowerPoint.
Smart Lookup has been getting smarter over time. When the feature first launched, it wasn’t very good at finding specific, timely information such as the current inflation rate in the United States. It was much better at finding more general information, such as a biography of the artificial intelligence pioneer Arthur Samuel. But Microsoft has done a lot of work on it, and it now works well when finding granular information as well.
Keep in mind that in order to use Smart Lookup in PowerPoint or any other Office 2016 app, you might first need to enable Microsoft's intelligent services feature, which collects your search terms and some content from your presentations and other documents. (If you're concerned about privacy, you'll need to decide whether the privacy hit is worth the convenience of doing research from right within the app.) If you haven't enabled it, you'll see a screen when you click Smart Lookup asking you to turn it on. Once you do so, it will be turned on across all your Office 2016 applications.
Collaborate in real time
The most important feature in PowerPoint 2016 for those who work with others is real-time collaboration that lets people work on presentations together from anywhere in the world with an internet connection. To do it, you must be logged into your Microsoft or Office 365 account, and the document must be stored in OneDrive, OneDrive for Business or SharePoint Online.
To collaborate on a document, open it, then click the Share icon in the upper-right part of the screen. If you haven’t yet saved your file in OneDrive, OneDrive for Business or SharePoint Online, you’ll be prompted to do so. If you’re an Office subscriber, make sure the AutoSave button on the upper right of the screen is switched to On. If it isn’t, you won’t be able to work live on documents with other people.
What happens next depends on whether your document is stored in your own OneDrive or with OneDrive for Business or SharePoint Online. In May 2017, Microsoft rolled out a new sharing interface to enterprise Office 365 users that it says is simpler and gives greater control over who has access to your content. A Microsoft representative told us that the company intends to roll out the newer interface to consumers with an Office 365 subscription at some point, but it hasn’t announced timing yet. The new interface isn’t planned for non-subscription versions of Office 2016 or earlier. So we’ll give instructions for both interfaces below.
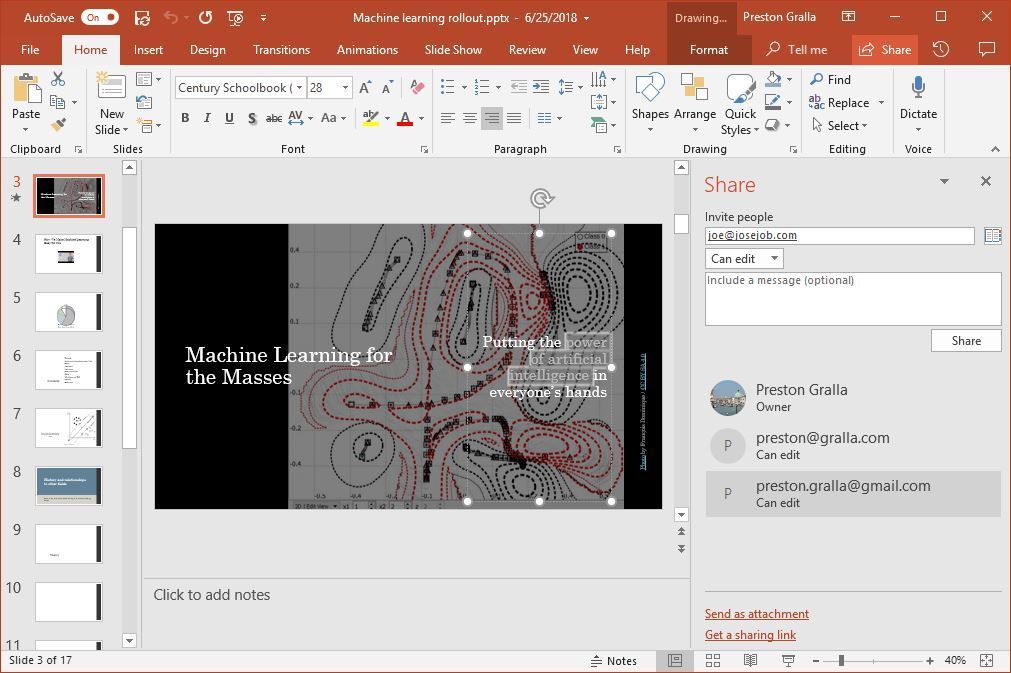
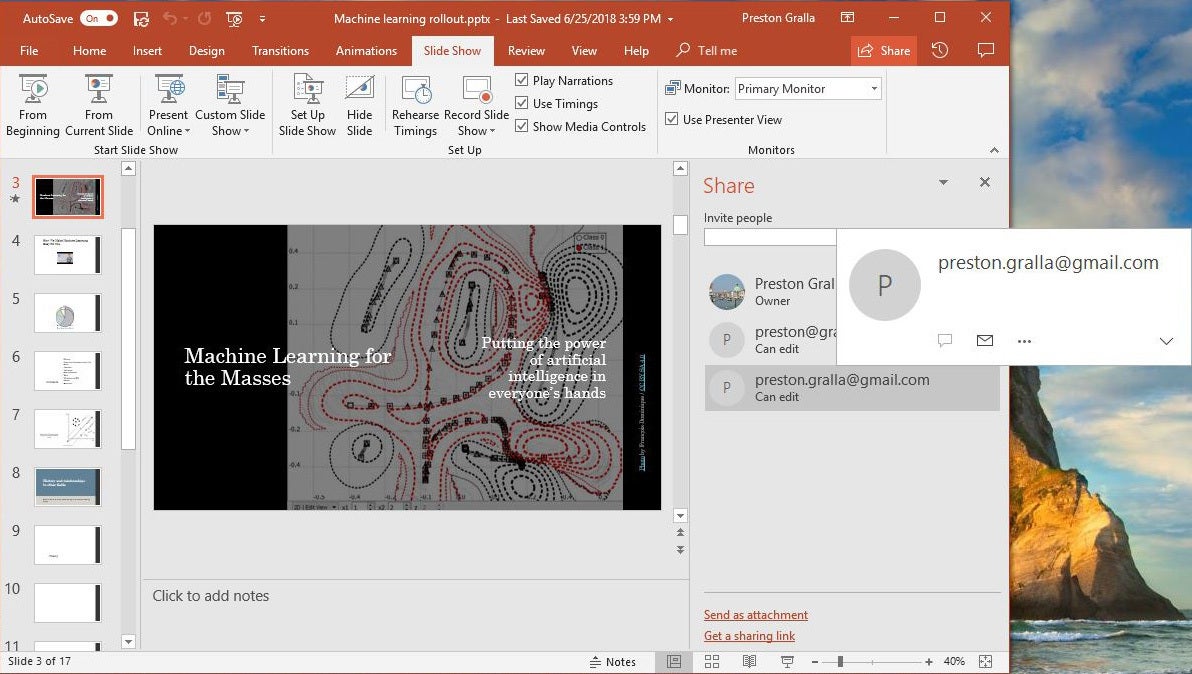
If your document is stored in your personal OneDrive: After you’ve saved your document to OneDrive and clicked the Share button, the Share pane opens on the right-hand side of the screen. Think of the pane as command central for collaboration. At the top of the pane, type in the email addresses of the people with whom you want to collaborate on the document, separated by commas. As you type, PowerPoint looks through your address book and displays the matches it finds; click the person you want to invite. If you’re on a corporate network, you can click the address book on the right to search through your corporate email address book. If a person isn’t in your address book, type in the complete email address.
 IDG
IDG
Selecting people with whom to collaborate via the Share pane.
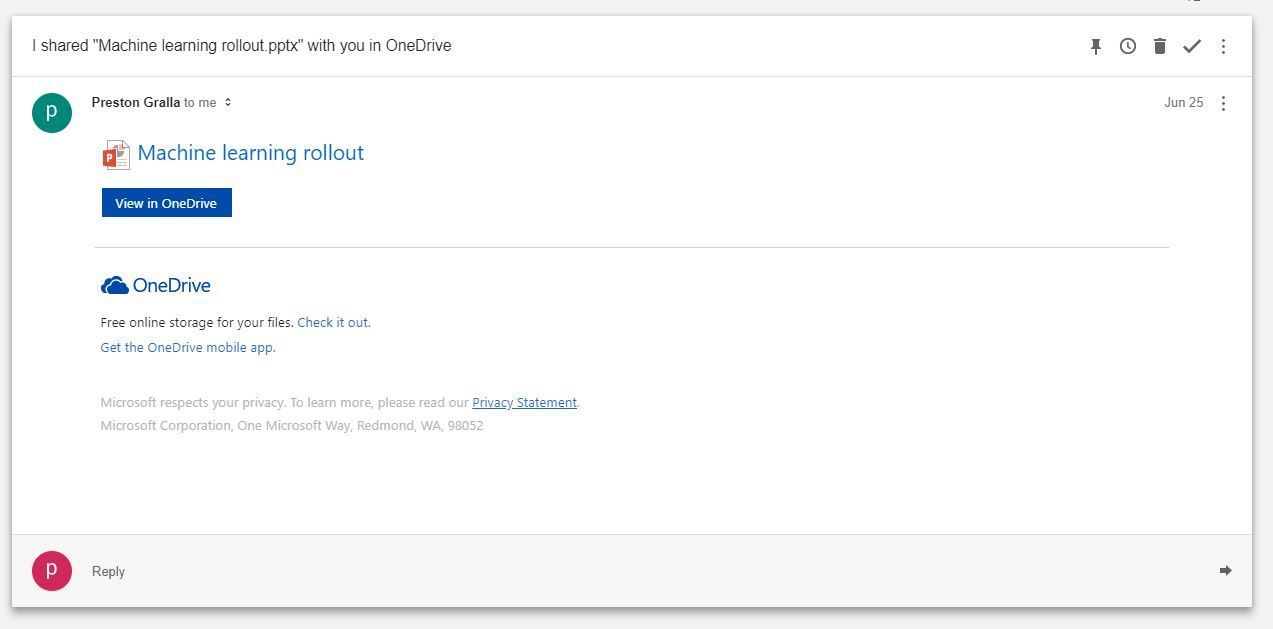
After you enter the addresses, select either "Can edit" or "Can view" in the dropdown to allow collaborators full editing or read-only privileges. (If you want to assign different rights to different users, send separate emails, or you can change any collaborator’s permissions later by right-clicking their name in the Share pane.) Type a message in the text box if you want. When you’re done, click Share. An email is sent out to everyone with whom you’ve shared the file, showing a “View in OneDrive” button that they can click to open the document.
 IDG
IDG
Your collaborators get an email message like this when you share a document.
There’s another way to share a file stored in a personal OneDrive for collaboration: At the bottom of the Share pane, click “Get a sharing link,” and from the screen that appears, choose “Create an edit link” if you want to create a link to the file that will allow people to edit the file, or “Create a view-only link” if you want to create a link that will allow them to view the file only. Then create an email using any email program, copy the link and send it.
If you want to instead send the file but don’t want to let people collaborate on it, at the bottom of the Share pane click “Send as attachment.” You can then send the file either in PowerPoint format or else as a PDF. When you do this, it won’t reflect any changes you make to it after you send the file.
If your document is stored in SharePoint Online or OneDrive for Business: Click the Share button. That pops up a Send Link window. From here you can send an email with a link where others can access the document.
 Microsoft
Sharing a presentation via the Send Link pane.
By default, only the people whose email addresses you enter will be able to edit the document, but you can click the permission box to expand access to anyone who already has access to the file, anyone in your organization, or anyone at all. (You can uncheck the “Allow editing” box to set any of those permissions to read-only.)
 Microsoft
Enterprise users can fine-tune access and editing permissions for their shared presentation here.
Back in the main Send Link window, enter the recipients’ email addresses (as you type, Excel will suggest people from your address book whom you can select), optionally type in a message, and click Send. An email is sent to all the recipients, with a link they can click to open the document.
To begin collaboration: Whether the email recipients get is associated with a personal or business OneDrive account, they click a button or link to open the document, which opens in PowerPoint Online in a web browser rather than in the PowerPoint desktop client. In order to collaborate, they’ll need to click the Edit Presentation button at the top of the screen. From the dropdown list, they can then choose to open the file either in the client version of PowerPoint or in the free web version. (OneDrive for Business and SharePoint users with Office 365 subscriptions see something slightly different — they can begin editing immediately in the web version or else click the “Open in PowerPoint” link to work in the client version.)
The web version isn’t as fully featured as the client version — for instance, there aren’t as many transitions and animations, you can’t record your screen from inside PowerPoint, and you can’t give slideshows or use several other features. But for basic editing, it works fine.
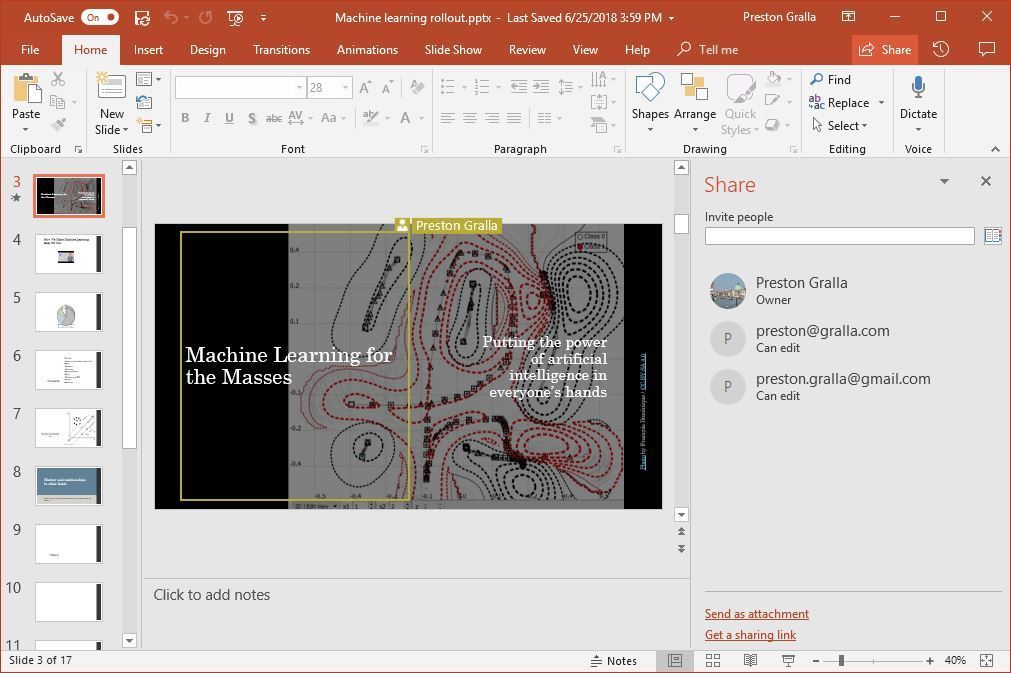
When you're working on a presentation with other people in real time, each person gets a cursor with a unique color. You can see what they do as they do it, including deleting, editing and adding text. They see what you do as well.
 IDG
IDG
Here’s what PowerPoint looks like when two people are collaborating on a document.
You can do more than see each other’s work. You can communicate as well. The Share pane shows a list of people who have editing access to the document. Those who are currently in the document have a colored bar next to their icon. That bar matches the color of the cursor you'll see as they move around in the document.
Hover your cursor over the icon of anyone currently working on the document, and a screen pops out with the various ways you can contact that person, including text chat, phone and video via Skype (if the person has Skype) and email. That lets you talk or text while you're working on the document together, making collaboration that much more effective.
 IDG
IDG
Click the icon of someone working with you on a document to see other ways you can contact that person.
Be aware that how well real-time collaboration works depends on the strength of your internet connection. On slow or flaky connections, you won’t immediately see edits that other people make and they won’t see yours immediately — there will be a lag. So it’s always best, when possible, to have the strongest connection possible when collaborating.
Page Break
Add new types of charts
In PowerPoint 2016 (as well as Excel 2016 and Word 2016), you get six new types of charts you can add to documents: Treemap, Sunburst, Waterfall, Histogram, Pareto, and Box & Whisker. Each provides a unique way to display data visually. See our Excel 2016 cheat sheet for details about the new chart types, including what each one looks like and what type of data it’s best suited for.
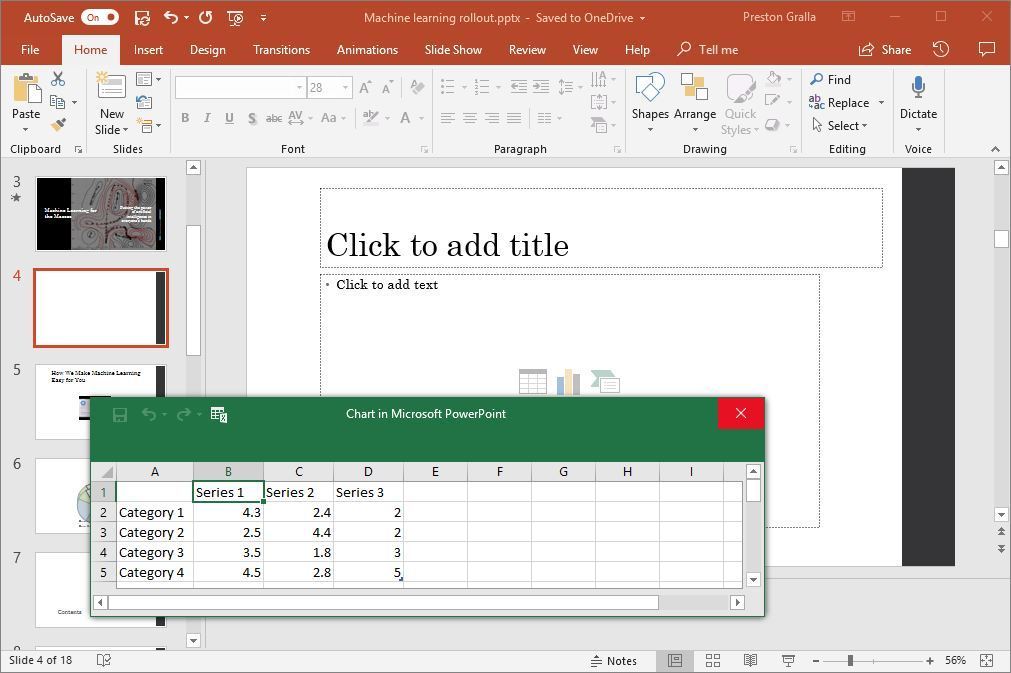
To insert any of the new chart types (or any other chart) in a document, select Insert > Chart and then choose the type of chart to insert. You can also click the chart icon in the area that appears when you create a new slide — it’s in the box that also lets you add text, tables, graphics and other content. Whichever way you choose to add the chart, it appears in your document with placeholder data, and a pop-up window appears that looks like a mini Excel spreadsheet. Enter or edit the data, or else click the Edit in Excel button to open it up in Excel and edit it there.
 IDG
IDG
When you insert a chart, a window where you can edit the data pops up.
Note that the Pareto chart does not show up when you select Insert > Chart. To insert one, you’ll have to first select Histogram from the list of chart types, and at the top of the screen that appears, select the option to the right, Pareto.
The following three features are available only for people who subscribe to Office 365. If you have the standalone version of PowerPoint 2016, you can skip right to the keyboard shortcuts chart.
Get a jump-start on your presentations
After PowerPoint 2016 was introduced, Microsoft rolled out QuickStarter, a great tool for anyone who hates being confronted with a blank slate when starting a presentation. Available only for Office 365 subscribers, it jump-starts your presentation by helping you with research and outline creation.
To use it, when you create a new presentation, select QuickStarter, type in the topic of your presentation, and then choose from a list of subtopics. QuickStarter suggests a set of slides you might want to use, based on Bing searches and information from Wikipedia. Choose which slide(s) to keep, and then select a look for your slides, including a theme complete with background graphics. You’ve now got a good start on your presentation.
Boost your presentations with Designer, Morph and Zoom
Three other features introduced after the release of PowerPoint 2016, and thus available only to Office 365 subscribers, are Designer, Morph and Zoom.
Designer makes it easy to quickly create high-quality slides without you doing much work. When you insert an image into a slide, the Design Ideas panel opens on the right side of the screen, offering you a choice of multiple layouts for the slide. Choose the layout you want and take it from there.
Microsoft claims the feature was built with the help of graphic designers and takes into account the content of the image. For example, a Microsoft blog about Designer and Morph claims that “if the visual contains a natural scene, Designer can zoom, crop and frame it. But if the image contains a chart, it focuses in on the relevant region to ensure the important data is highlighted.”
As for Morph, it lets you show motion in transitions and inside slides, but without having to use the Animations tab. To use it, duplicate an existing slide: Select the slide, then, on the Home tab, click the down arrow next to New Slide and select Duplicate Selected Slides. Then make changes to that duplicate, such as shrinking an element or elements in it, making them bigger, moving them to new locations and/or rotating them. Now select Morph from the Transitions tab, and PowerPoint automatically creates an animated transition between the slides. Onscreen, they look like a single slide morphing.
The third new feature, Zoom, makes it easy to jump around in your presentation, showing your slides in nonsequential order. It does this by creating a kind of visual shortcuts table that lets you quickly zoom from one section to another — handy in case you want to go back to a previous slide or skip over a section of your presentation.
When you’re in a presentation, select Insert > Zoom. You get a choice of three different kinds of Zoom:
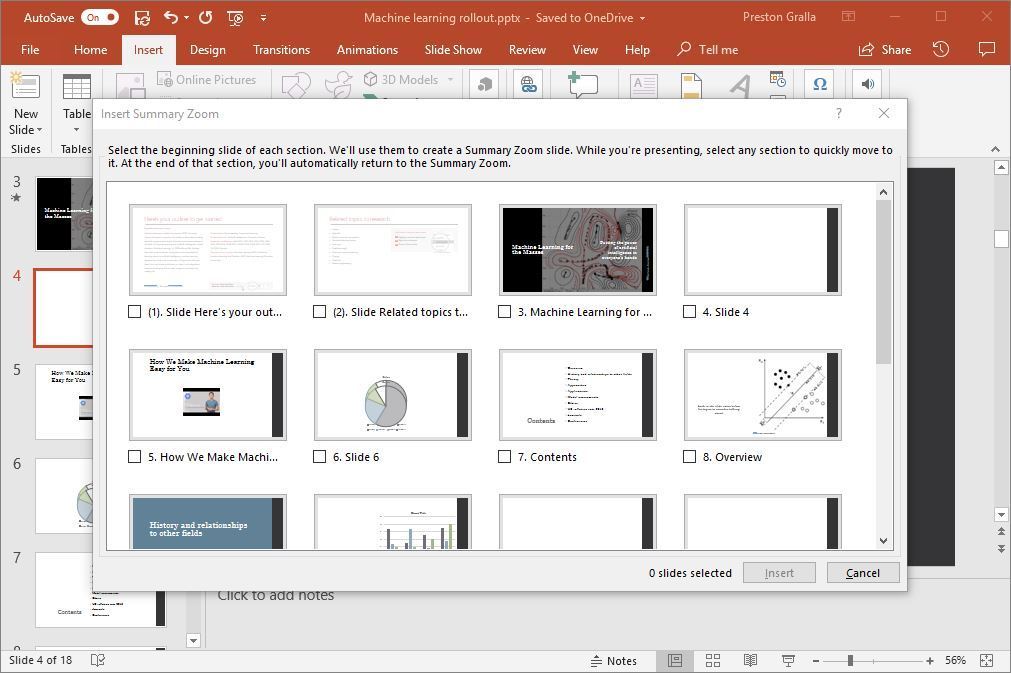
- Summary Zoom: This lets you create a visual summary of your presentation. You select the slides you want included in the summary. Each of those slides becomes the beginning of a section of the presentation. When you’re giving a presentation, you can click a thumbnail on the Summary Zoom slide to go to the beginning slide of a section.
- Section Zoom: If you’ve already created sections in your presentation, when you choose Section Zoom you’ll see those sections. Choose which you want to put on your Section Zoom slide. Then when you’re giving a presentation, click any thumbnail to jump to that section.
- Slide Zoom: This lets you jump from a slide to any other slide in the presentation. It’s generally best used for short presentations without many sections. After you click Slide Zoom, you select which slides you want to be able to jump to, and they’ll show up in a Slide Zoom slide. Click any slide to jump to it.
 IDG
IDG
Here’s how to insert a Summary Zoom slide, with thumbnails of your entire presentation.
Use AutoSave as a safety net while you work
Worried about losing your work on a presentation because you forgot to constantly save it? Worry no more. AutoSave, available only for those with Office 365 subscriptions, automatically saves your files for you, so you won’t have to worry about system crashes, power outages, Office crashes and similar problems. Be aware, though, that it works only on documents that are stored in OneDrive, OneDrive for Business or SharePoint Online.
You may think you’re already protected against these problems because of the AutoRecover feature built into Office 2016. But AutoSave is significantly different and better than AutoRecover. AutoRecover doesn’t save your file in real time, so it’s easy for you to lose work. Instead, every several minutes it saves an AutoRecover file that you can try to recover after a crash. But this feature doesn’t always work (for example, if you don’t properly open Office after the crash, or if the crash doesn’t meet Microsoft’s definition of a crash). And Microsoft notes, “AutoRecover is only effective for unplanned disruptions, such as a power outage or a crash. AutoRecover files are not designed to be saved when a logoff is scheduled or an orderly shutdown occurs.” And the files aren’t saved in real time, so you’ll lose several minutes of work even if all goes as planned.
AutoSave is turned on by default in the subscription version of PowerPoint 2016 (for documents stored in OneDrive, OneDrive for Business or SharePoint Online). To turn it off (or back on again), use the AutoSave button on the top left of the screen.
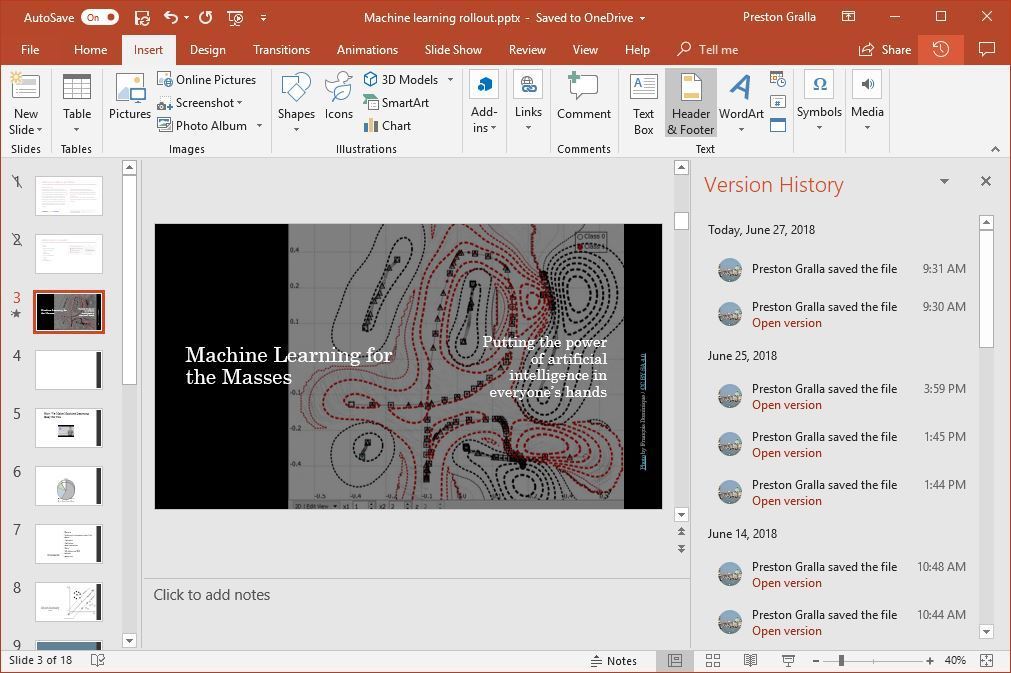
AutoSave has another great feature as well: You can use Version History to go back to previous versions of a file, review them, and copy and paste from an older file to your existing one. You can also restore an entire old version.
To use it, with a file open, click the file name at the top of the screen. A dropdown menu appears with the location of the file and a Version History section. Click “See all versions,” and the Version History pane appears on the right side of the screen with a list of the previous versions of the file, including the time and date they were saved. Alternatively, you can click the Version History button on the upper-right corner of the screen (it looks like a clock surrounded by a circular arrow) to display the Version History pane.
Click “Open version” under any older version, and that version appears in a new window. Scroll through the version and copy any content you want.
 IDG
IDG
Scrolling through previous versions of a presentation.
Handy keyboard shortcuts
Using keyboard shortcuts is one of the best ways to accomplish tasks quickly in any version of PowerPoint 2016. You can even use them to navigate the Ribbon. For instance, Alt-H takes you to the Home tab, and Alt-G takes you to the Design tab. (For help finding specific commands on the Ribbon, see our PowerPoint 2016 Ribbon quick reference.)
But there are many other keyboard shortcuts to help you accomplish a vast array of tasks in PowerPoint 2016. We've listed the ones we've found the most useful below. Want even more shortcuts? Microsoft's Office site has comprehensive lists of shortcuts for creating and delivering PowerPoint presentations.
Useful PowerPoint 2016 keyboard shortcuts
Don't forget to download our PowerPoint 2016 Ribbon quick reference!