Word for Office 365 cheat sheet
- 23 October, 2019 20:59
Word has always been the workhorse app of the Microsoft Office suite. Nearly everyone who uses Office ends up using Word at some point, whether it be for writing memos, typing up agendas, creating reports, crafting business correspondence or any of a thousand other uses.
Microsoft sells Office under two models: Individuals and businesses can pay for the software license up front and own it forever (what the company calls the “perpetual” version of the suite), or they can purchase an Office 365 subscription, which means they have access to the software for only as long as they keep paying the subscription fee.
When you purchase a perpetual version of the suite — say, Office 2016 or Office 2019 — its applications will never get new features, whereas Office 365 apps are continually updated with new features. For more details, see “What are the differences between Microsoft Office 2019 and Office 365?”
This cheat sheet gets you up to speed on the features that have been introduced in Office 365’s Word for Windows desktop client since 2015. We’ll periodically update this story as new features roll out. (If you’re using the perpetual-license Word 2016 or 2019, see our separate Word 2016 and 2019 cheat sheet.)
Share this story: IT pros, we hope you’ll pass this guide on to your users to help them learn to get the most from Word for Office 365.
Use the Ribbon
The Ribbon interface is alive and well in the current version of Word. Since it has been included in Office applications since Office 2007, you’re probably familiar with how it works, but if you need a refresher, see our Word 2010 cheat sheet.
In September 2018, Microsoft overhauled the way the Ribbon looks. It’s now flatter-looking, cleaner and less cluttered, and has high-contrast colors, which makes the icons and text on the Ribbon easier to see. The blue bar at the top has been reduced as well, with the tab names now appearing on a gray background. But it still works in the same way, and you’ll find most of the commands in the same locations as in earlier versions.
 IDG
IDG
Word’s Ribbon is now flatter looking, with more contrast than in the past, but still works the same way. (Click image to enlarge it.)
One minor change to the Ribbon layout is that there’s now a Help tab to the right of the View tab. And there are slight variations in the Ribbon’s appearance between editions of Word in Office 365. For instance, the Search box is located to the right of the Ribbon tabs in consumer editions but above the Ribbon tabs in enterprise editions.
To find out which commands live on which tabs on the Ribbon, download our Word for Office 365 Ribbon quick reference. Also note that you can use the search box on or above the Ribbon to find commands.
Just as in earlier versions of Word, to make the commands underneath the tabs on the Ribbon go away, press Ctrl-F1. (Note that the Ribbon tabs — File, Home, Insert and so on — stay visible.) To make the commands appear again, press Ctrl-F1.
You’ve got other options for displaying the Ribbon as well. To get to them, click the “Ribbon display options” icon at the top right of the screen, just to the left of the icons for minimizing and maximizing Word. A drop-down menu appears with these three options:
- Auto-hide Ribbon: This hides the entire Ribbon, both the tabs and commands underneath them. To show the Ribbon again, click at the top of Word.
- Show Tabs: This shows the tabs but hides the commands underneath them. It’s the same as pressing Ctrl-F1. To display the commands underneath the tabs when they’re hidden, press Ctrl-F1, click a tab, or click the Ribbon display icon and select “Show Tabs and Commands.”
- Show Tabs and Commands: Selecting this shows both the tabs and commands.
And if for some reason that blue on the title bar is too much color for you, you can turn it white, dark gray or black. To do it, select File > Options > General. In the “Personalize your copy of Microsoft Office” section, click the down arrow next to Office Theme and select Dark Gray, Black, or White from the drop-down menu. To make the title bar blue again, choose the Colorful option from the drop-down list. Just above the Office Theme menu is an Office Background drop-down menu — here you can choose to display a pattern such as a circuit board or circles and stripes in the title bar.
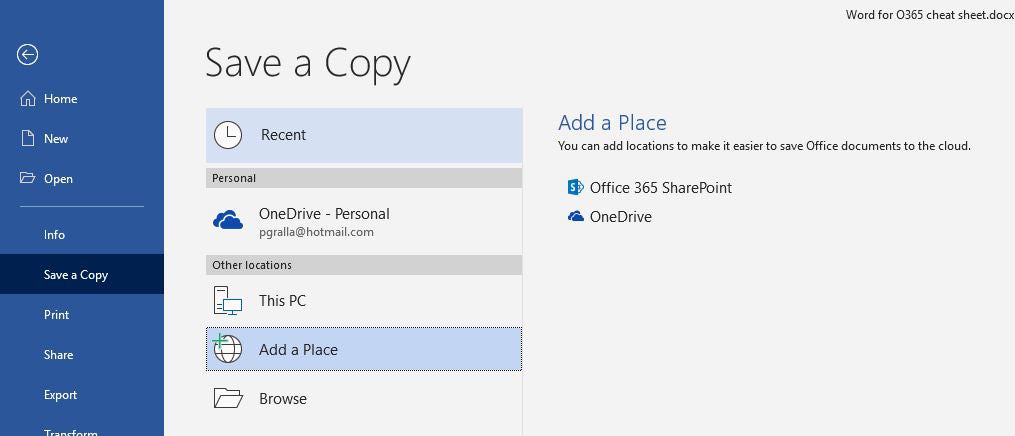
There’s a useful feature in what Microsoft calls the backstage area that appears when you click File on the Ribbon: If you click Open, Save a Copy, or Save As from the menu on the left, you can see the cloud-based services you've connected to your Office account, such as SharePoint and OneDrive. Each location now displays its associated email address underneath it. This is quite helpful if you use a cloud service with more than one account, such as if you have one OneDrive account for personal use and another one for business. You'll be able to see at a glance which is which.
 IDG
IDG
Select “Add a Place” on the left to add a new cloud storage service for Word. (Click image to enlarge it.)
In the works: A simplified Ribbon
Microsoft is also working on a simplified version of the Ribbon for all Office applications. Like the existing Ribbon, it will have tabs across the top, and each tab will have commands on it. But it’s more streamlined and uses less space than the existing Ribbon.
For now, only Outlook for Windows uses the simplified Ribbon in Office 365. However, some users can get a preview of what it will look like in Word by going to the online version of Word. Use the slider next to Simplified Ribbon at the top right of the screen to toggle the simplified Ribbon on and off. If you don’t see the slider at the top of the screen, go to the Ribbon’s View tab and check the box next to Simplified Ribbon. To revert to the regular Ribbon, uncheck the box.
 IDG
IDG
A cleaner, simpler Ribbon will be available in Word at some point, but if you want to try it now, head to the online version of Word, pictured here. (Click image to enlarge it.)
In the simplified Ribbon, all the commands are still there for each tab, but only the most commonly used are visible. Click the three-dot icon at the far right end of the Ribbon to show the rest of the commands in a drop-down menu.
In the Outlook desktop client, you can toggle between the streamlined and traditional Ribbon by clicking a small caret icon at the right edge of the Ribbon. We assume this will work the same way in Word, but at this point we have no details. We’ll update this section when the simplified Ribbon rolls out to Word for Windows.
Collaborate in real time
The biggest feature that’s been introduced in Word for Office 365 subscribers since 2015 is real-time collaboration. It lets people work on documents together from anywhere in the world with an internet connection, a feature that Google Docs has long had. Microsoft calls this “co-authoring.”
There are only three requirements for collaboration in Word for Office 365: You must be logged into your Microsoft or Office 365 account; the document must be stored in OneDrive, OneDrive for Business, or SharePoint Online; and AutoSave must be turned on.
To collaborate on a document, first open it, then click the Share icon in the upper-right part of the screen. If you haven’t yet saved your file in OneDrive, OneDrive for Business, or SharePoint Online, you’ll be prompted to do so. What happens next depends on whether your document is stored in your own OneDrive or with OneDrive for Business or SharePoint Online.
If your files are stored in your personal OneDrive, you’ll share documents via the Share pane. But if your files are stored in OneDrive for Business or SharePoint Online, you’ll use a newer interface that Microsoft rolled out to enterprise Office 365 users in May 2017. A Microsoft representative told us that the company intends to roll out the newer interface to consumers with an Office 365 subscription at some point, but it hasn’t announced timing yet. So we’ll give instructions for both interfaces below.
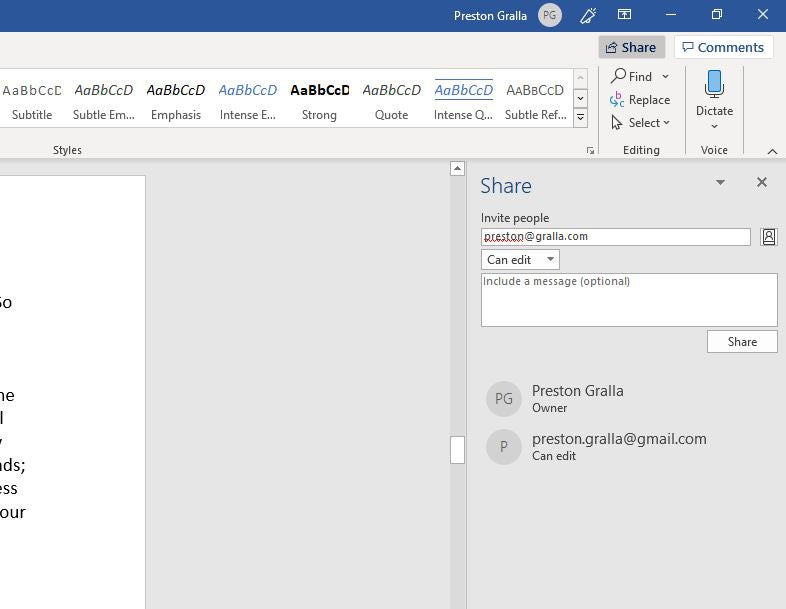
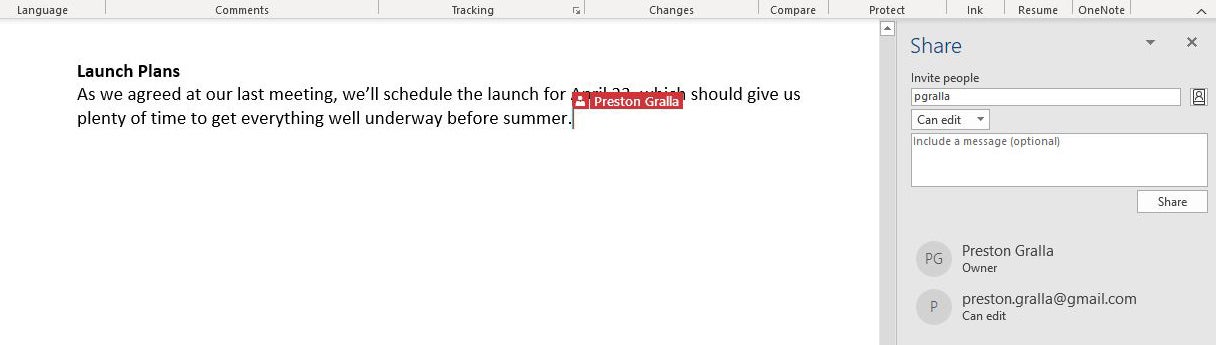
If your document is stored in your personal OneDrive: After you’ve saved the document to OneDrive and clicked the Share button, the Share pane will open on the right-hand side of the screen — this is command central for collaboration. At the top of the pane, type in the email addresses of the people with whom you want to collaborate on the document, separated by commas. As you type, Word looks through your address book and displays the matches it finds; click the person you want to invite. If you’re on a corporate network, you can click the address book on the right to search through your corporate email address book. If a person isn’t in your address book, just type in their complete email address.
 IDG
IDG
Inviting people to collaborate on a document via the Share pane. (Click image to enlarge it.)
After you enter the addresses, select either "Can edit" or "Can view" in the drop-down to allow collaborators full editing or read-only privileges. (If you want to assign different rights to different users, you can send two separate emails, or you can change any collaborator’s permissions later by right-clicking their name in the Share pane.) Type a message in the text box if you want. When you’re done, click Share. An email gets sent out to everyone with whom you’ve shared the file, showing an “Open” button that they can click to open the document.
There’s another way to share a file stored in a personal OneDrive for collaboration: At the bottom of the Share pane, click “Get a sharing link,” and from the screen that appears, choose “Create an edit link” if you want to create a link to the file that will allow people to edit the file, or “Create a view-only link” if you want to create a link that will allow them to view the file only. Then copy the link, write an email using any email program, paste in the link, and send the email.
If you want to instead send the file but don’t want to let people collaborate on it, at the bottom of the Share pane click “Send as attachment.” You can then send the file either in Word format or else as a PDF. When you do this, it won’t reflect any changes you make to it after you send the file.
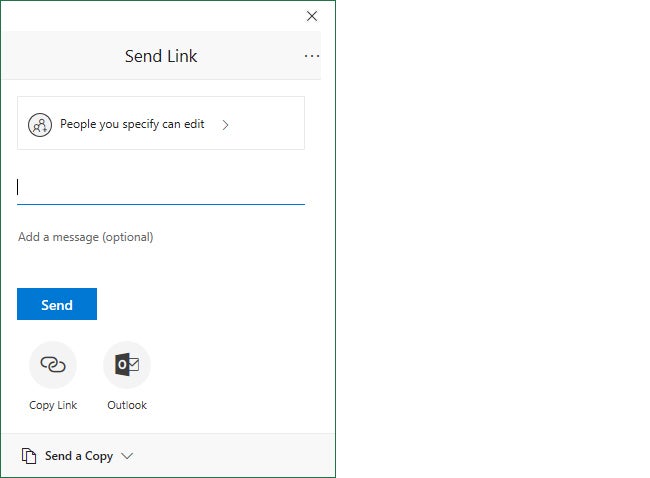
If your document is stored in SharePoint Online or OneDrive for Business: Clicking the Share button pops up a Send Link window. Here you can send an email with a link where others can access the document.
 IDG
IDG
Sharing a spreadsheet via the Send Link pane.
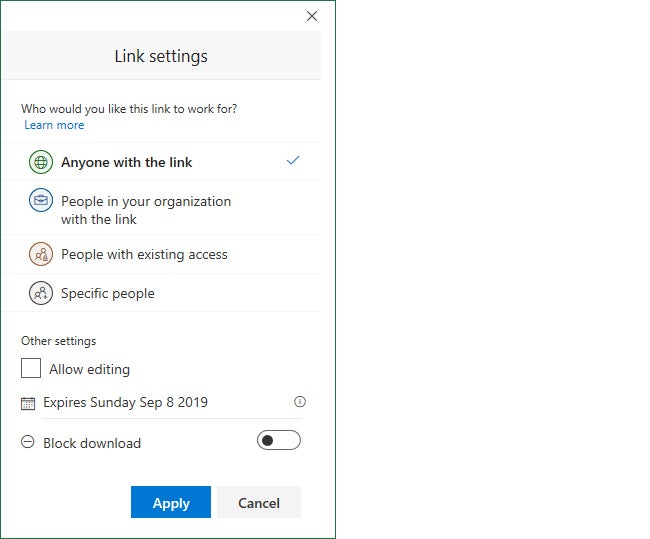
By default, only the people whose email addresses you enter will be able to edit the document. If you like, you can click “People you specify can edit” to call up a “Link settings” screen, where you can expand access to anyone with the link, people in your organization with the link, or anyone who already has access to the file.
On this screen you can also uncheck the “Allow editing” box to set any of those permissions to read only. If you do that, you can optionally block people from downloading the file by toggling the “Block download” slider on. Finally, if you choose the “Anyone with the link” option, you can set an expiration date after which they won’t be able to access the file. When you’ve made your selections, click Apply.
 IDG
IDG
Enterprise users can fine-tune access and editing permissions for their shared spreadsheet here.
Back in the main Send Link window, enter the recipients’ email addresses (as you type, Word will suggest people from your address book whom you can select), optionally type in a message, and click Send. An email is sent to all the recipients with a link they can click to open the document. Note that depending on how your IT department has set up permissions for users, you may not be able to send the invitation to people outside your organization.
(If you’d rather send recipients a copy of the workbook as an Excel file or a PDF, and thus not allow real-time collaboration, click Send a Copy at the bottom of the Send Link screen.)
To begin collaborating: When your recipients receive the email from you, they click a button or link to open the document, which opens in Word Online in a web browser rather than in the Word desktop client. Depending on a variety of factors, including whether recipients are signed into an Office 365 account, whether the file being shared is stored in a personal OneDrive or in OneDrive for Business/SharePoint, and whether the sender and recipient are from the same organization, recipients may or may not be able to start editing the document in their browser right away. Some users will have to click an Edit in Browser button first, and some will be able to choose between editing the doc in the browser or editing it in their desktop Word app.
The web version isn’t as fully featured as the client version — for instance, there aren’t as many formatting options and you can’t insert shapes, take screenshots, use mail merge, or use several other features. But for basic editing, it works fine.
When any collaborators open the document, you’ll see a colored cursor bar for each person that indicates their presence in the document. Each person gets their own unique color. Hover your cursor over anybody else’s cursor bar to see their name. Once they begin editing, you can see what each collaborator does as they do it, including deleting, editing and adding text. They see what you do as well.
 IDG
IDG
In Word for Office 365 you can see other collaborators’ edits in real time, with a different colored cursor for each collaborator. (Click image to enlarge it.)
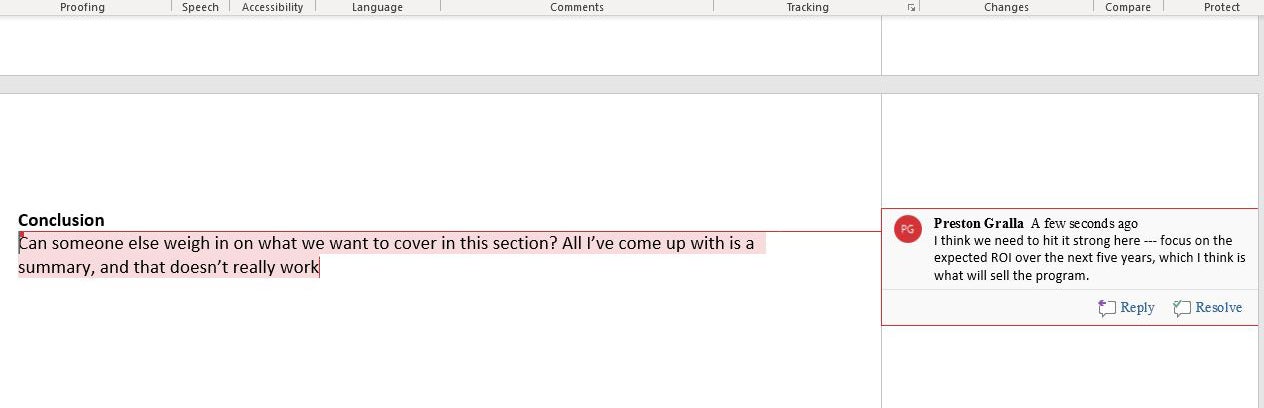
Collaboration includes the ability to make comments at specific places in a document without actually changing the document’s contents. To do it, place your cursor in the document where you want the comment to appear (or select a word or phrase), click the Comments button in the upper right of the screen, and select New Comment. A new comment box appears in the right margin; type in your comment there. If you want to draw a colleague’s attention to a comment, @ mention them in the comment, they’ll receive an email notification with a link to the document.
Everyone collaborating can see all comments in the right margin. To reply to a comment, hover over it, click the Reply button, and type your response. There’s also a Resolve button that grays out the comment.
 IDG
IDG
To reply to a comment, hover over it, click the Reply button, and type your reply. (Click image to enlarge it.)
Be aware that how well real-time collaboration works depends on the strength of your internet connection. On slow or flaky connections, you won’t immediately see edits that other people make and they won’t see yours immediately — there will be a lag. So it’s always best, when possible, to have the strongest connection possible when collaborating.
If your document is stored in your personal OneDrive, the Share pane shows a list of all people currently collaborating on the workbook or who have been given access to it. If you don’t see the Share pane, click the Share button at the top of the screen to open it.
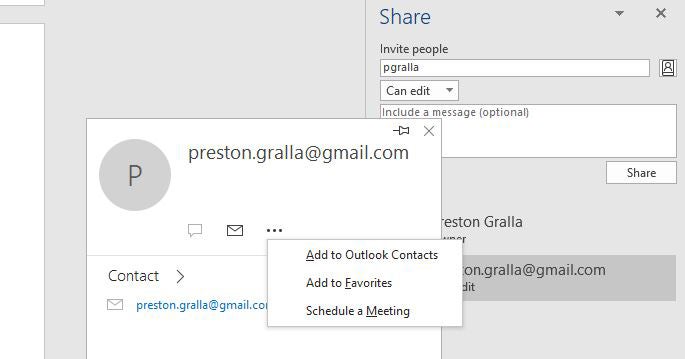
Double-click any name in the pane, and a screen appears that lets you communicate with them as you work. Email is always available, although that’s not particularly useful for simultaneous collaboration, since back-and-forth may take a while. Instant messaging and making voice calls using VoIP are available, but only via Skype and only if both of you are signed into Skype while you’re working on the document. Click the three-dot icon to the right of their email address, and you’ll be able to add the person to your address book, schedule a meeting with them, and add them to your favorites.
 IDG
IDG
Click the icon of someone working with you on a document to see other ways you can contact them. (Click image to enlarge it.)
If the Share pane distracts you, click the X on its upper right and it goes away. To make it appear again, click the Share button at the top of the screen.
As noted previously, if your workbook is stored in SharePoint or OneDrive for Business, you won’t have a Share pane. But you can still see who has access to the file by clicking the Share button. In the Send Link screen that opens, click the three-dot icon in the upper right and select Manage Access to see a list of people who can access the file. Here you can change edit/view permissions, revoke someone’s access, or remove the sharing link altogether.
Search to get tasks done quickly
A very useful addition to Word 2016 was called Tell Me — basically, an enhanced search feature for finding commands in Word. Now renamed simply Search, it’s extremely helpful when you want to do a task that you haven’t done before or have forgotten how to do.
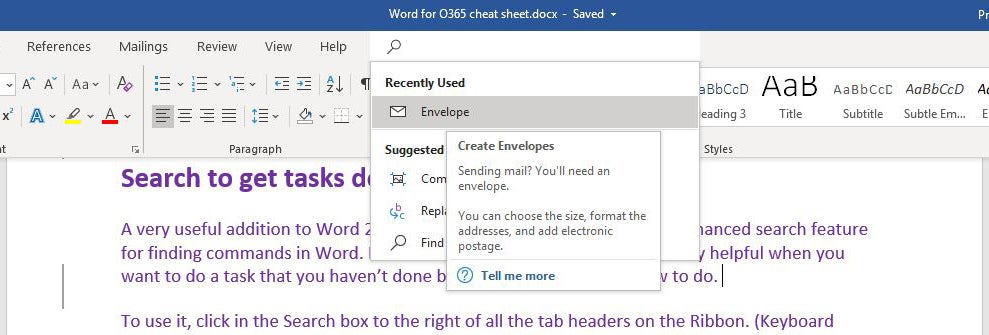
To use it, click in the Search box — for some Office 365 subscribers, it’s located on the Ribbon to the right of all the tab headers; for others, it’s above the Ribbon in the blue title area. (Keyboard fans can instead press Alt-Q to go to the Search box.) Type in a task, and you’ll get a list of possible matches. Click the task you want to get instructions on how to do it.
For example, I typed “address an envelope” and chose the “Envelope” result, and the screen you use for addressing envelopes appeared. When I typed in the more general query “write an essay,” it popped up a link to Word’s Researcher feature that lets you do research from right within Word, add sources from the research you find, and then cite the sources in the document properly. If you type in a query and hover your mouse over a result instead of clicking it, you’ll see a screen describing what you can do if you click the results.
 IDG
IDG
The Search box gives advice on addressing an envelope (or any other task). (Click image to enlarge it.)
It’s a big time-saver, because you don’t have to hunt through the Ribbon to find the command you want. And it remembers the features you've previously selected in the box, so when you click in it, you first see a list of previous tasks you've searched for. That way, tasks that you frequently perform are always within easy reach.
Search is gaining more capabilities, too. Some users of enterprise and education editions of Office 365 are now able to use the Search box to find people in their organization, SharePoint resources, and other personalized results from within Word. (These features are being rolled out in stages, so you might not have them yet.)
Page Break
Use Smart Lookup for quick online research
A handful of new features help you do research or fact-checking when working on a document. The most useful for most people is Smart Lookup. Right-click a word, or highlight a group of words and right-click them, and from the menu that appears select Smart Lookup. Word then uses Microsoft’s Bing search engine to do a search on the word or phrase and displays the results in a pane that appears on the right side of the screen. Microsoft says that Smart Lookup uses the context around the words, not only the words themselves, to give you more relevant results.
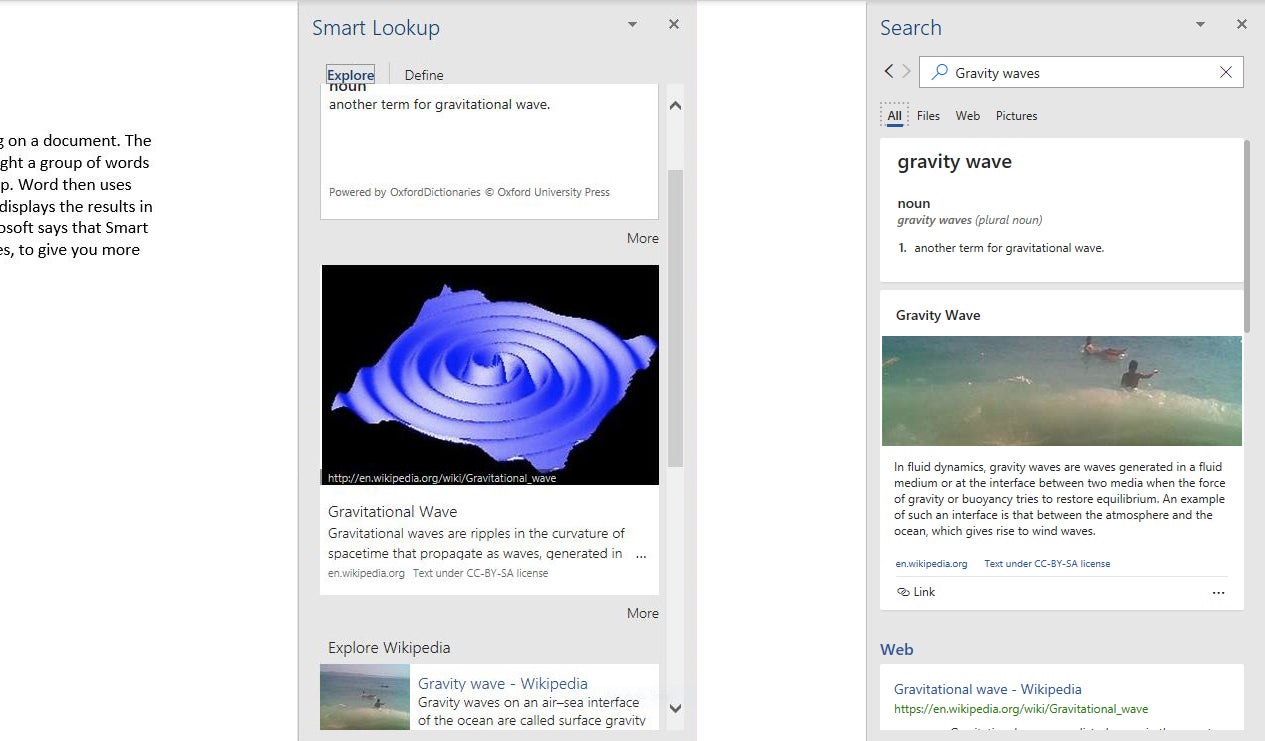
If you’re using a consumer edition of Office 365, the Smart Lookup pane has two tabs at the top, Explore and Define. Explore shows information and links from the web, while Define offers definitions from the Oxford Dictionary.
 IDG
IDG
The results of a Smart Lookup for gravity waves in consumer (left) and enterprise/educational editions (right) of Office 365. (Click image to enlarge it.)
For web links, click any result to go to the web page that is the source of the results. The first result on the Explore tab may be a brief definition of the word. Following that is often an entry from Wikipedia, followed by a variety of other results. For example, when I searched for “gravity waves,” the first two results were from Wikipedia, one for “Gravitational Wave” and other for “Gravity wave.” Depending on how much information Bing gathers, you may see the results put into groups, such as “Explore Wikipedia,” “Bing image search,” and “Web search.” When you click an image thumbnail in the “Bing image search” section, you’ll be sent to a web page with that image, plus other related images.
A three-dot icon to the right of the entry indicates that there’s more information available on the web. In most cases when you click the three-dot icon, you’ll go to the web page from which Bing gathered the information; in some instances, however, you’re sent to a new page in the Smart Lookup pane titled “Quick insights” that has the additional information, plus a “See also” area that has related topics you can explore by clicking the appropriate picture. When I performed the “gravity wave” lookup, for example, there were entries for Wind Wave, Capillary Wave, Rogue Wave, Internal Wave and Wave.
Enterprise and education editions of Office 365 have a slightly different Smart Lookup interface; there, the pane shows results under tabs marked All, Files, Web, and Pictures. Web shows web results (often starting with a simple definition), Pictures shows image thumbnails from a Bing image search, and Files shows matching results from your documents stored in OneDrive for Business. All, of course, shows them all.
Each web result has Open, Link, and Cite links underneath it. Click Open, and the page opens in your browser. Click Link and a link to the entry will be embedded in your document. Click Cite to embed a citation of the link source. File results have links underneath for opening the document, linking to it, or reusing content such as images or PowerPoint slides from it.
When you click an image thumbnail in the results, it is automatically pasted into your document at the point where you have your cursor. You can alternatively click a thumbnail’s three-dot icon, then the image’s source URL, to open the source page for the image in your browser.
Note that in order to use Smart Lookup in Word or any other Office app, you might first need to enable Microsoft’s intelligent services feature, which collects your search terms and some content from your spreadsheets and other documents. (If you’re concerned about privacy, you’ll need to weigh whether the privacy hit is worth the convenience of doing research from right within the app.) If you haven’t enabled it, you’ll see a screen when you click Smart Lookup asking you to turn it on. Once you do so, it will be turned on across all your Office applications for all features that use intelligent services.
Use Researcher for in-depth research
Academics, students, and those wanting to do in-depth research will welcome the new Researcher tool. Unlike Smart Lookup, Researcher doesn’t feed you information straight from the web via Bing. Instead, Researcher taps into reference materials and sources it considers trustworthy, compiled by a service called Microsoft Academic Search, so you’re getting a search that should be more reliable and in-depth than Smart Lookup. It also includes results from Wikipedia and Bing that it considers trustworthy.
Like Smart Lookup and Word’s new Translator feature (see below), Researcher uses Microsoft’s AI-driven intelligent services feature. If you haven’t already enabled it, you’ll need to do so before using Researcher.
To use it, select References > Researcher in the Ribbon. The Researcher pane appears on the right side of the screen. Type your search term into the text box, and you’ll see a list of results that are far more finely honed than you get when using Smart Lookup.
 IDG
IDG
Researcher offers more granular, in-depth information than Smart Lookup. (Click image to enlarge it.)
At the top of the screen you’ll find topics related to your search. For example, when I searched for “gravity waves” it found “Gravity wave,” “Gravitational wave,” and “Speed of gravity.” Click any topic and you’ll get more in-depth information about it, including results from Wikipedia and from other academic and general-interest sources.
Underneath those topics you’ll find individual results from a wide variety of sources, including academic research, newspaper articles, magazine articles, and more. The results are sorted into All, Journals, and Websites tabs. Click the appropriate tab to see the results filtered. Click any link to open a summary of the article or website, then click the “Open in browser” button to go to the full article or site in your browser.
You can add a citation directly from the Researcher pane into your document. Click the + sign to the right of the item, and Researcher adds the citation at the current location of your cursor. You can edit the citation in your document by clicking on it, then clicking the small down arrow that appears to its right. You can also add text from the Researcher pane, or add text and include a citation. To do it, select the text you want to add, and from the menu that appears, select either Add or Add and Cite.
Finally, at the top of the Researcher pane you’ll find a My Research tab next to the Find Sources tab. Click it, and it displays all of the results that you’ve clicked on so you can easily return to them.
Get instant translations with Translator
Another useful addition is the Translator pane, useful for those who need to work in multiple languages. To translate words or phrases, select them, right-click your selection and choose Translate from the menu that appears.
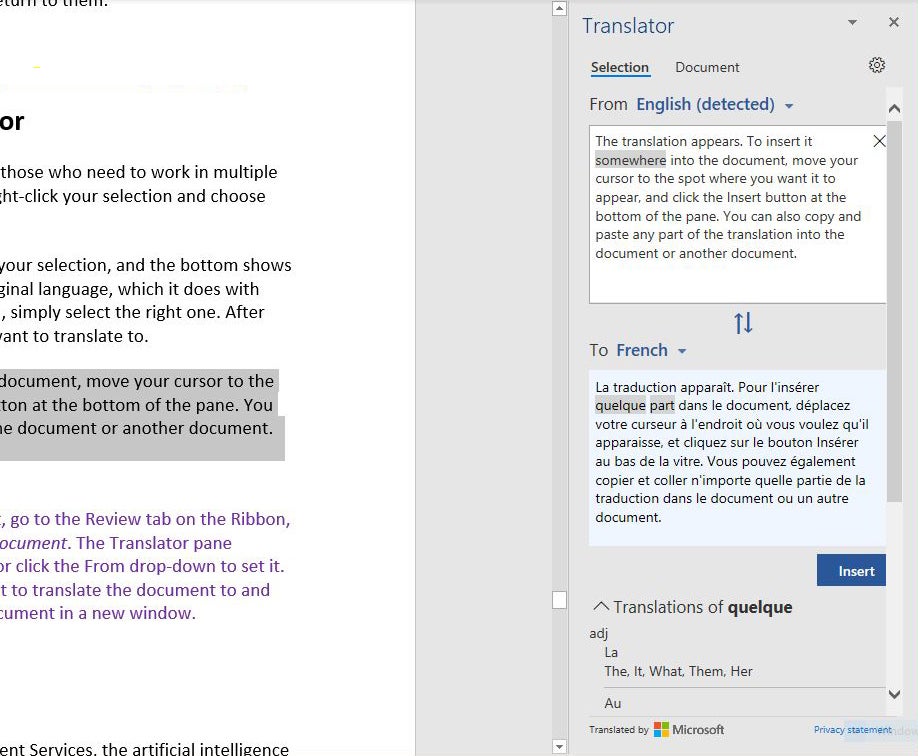
The Translator pane appears. The top of the pane shows your selection, and the bottom shows the translation. The top pane attempts to identify the original language, which it does with uncanny accuracy. If it misidentifies the language, though, simply select the right one. After that, in the bottom of the pane select the language you want to translate to.
The translation appears. To insert it somewhere into the document, move your cursor to the spot where you want it to appear, and click the Insert button at the bottom of the pane. You can also copy and paste any part of the translation into the document or another document.
 IDG
IDG
With Translator, you can translate a word, a section of a document, or the entire document from one language to another. (Click image to enlarge it.)
Translator can also translate an entire document. To do it, go to the Review tab on the Ribbon, and in the Language section, click Translate > Translate Document. The Translator pane appears. You can let it auto-detect the original language or click the From drop-down to set it. Then click the To drop-down to set the language you want to translate the document to and click the Translate button. Word opens the translated document in a new window.
Keep in mind that Translator is part of Microsoft’s Intelligent Services, the artificial intelligence behind other Office features including Smart Lookup and Researcher. You’ll need to enable it before using any of these features.
Add new types of charts
Since 2015, Microsoft has added several new types of charts you can add to documents, spreadsheets, and presentations: Treemap, Sunburst, Waterfall, Histogram, Pareto, Box & Whisker, Funnel, and Map charts. Each provides a unique way to display data visually. See our Excel for Office 365 cheat sheet for details about the new chart types, including what each one looks like and what type of data it’s best suited for.
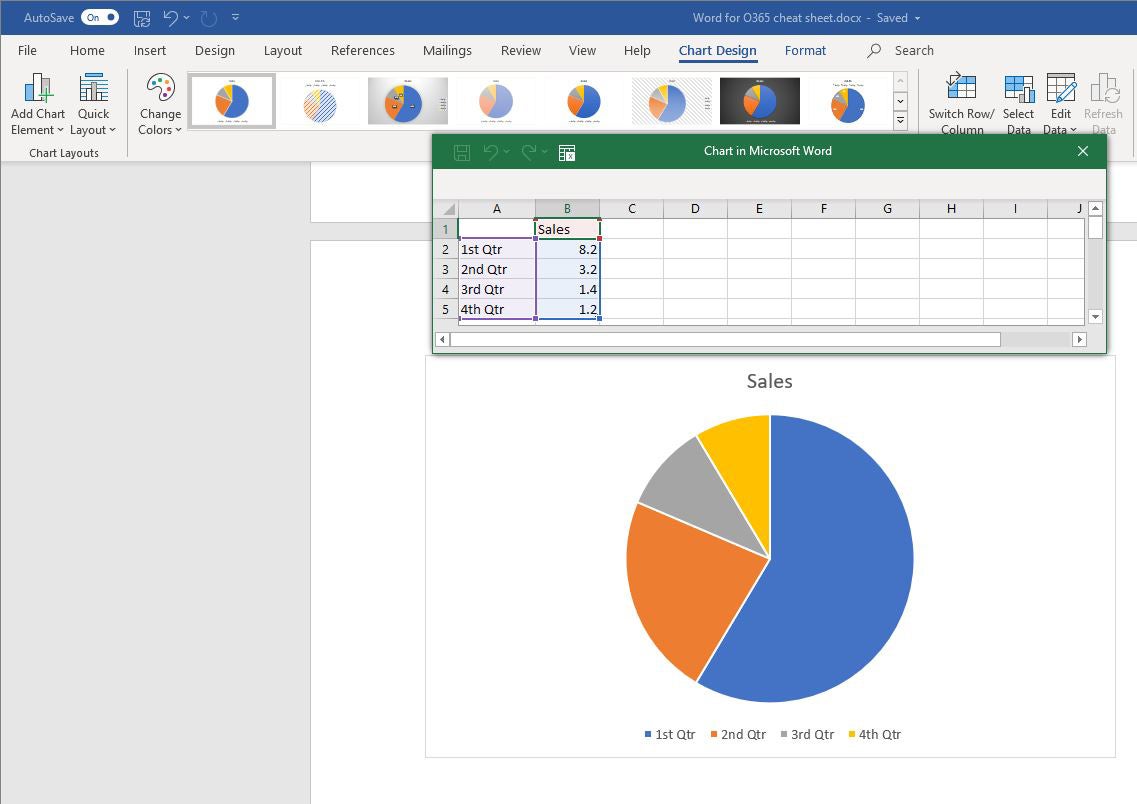
To insert any of the new chart types (or any other chart) in a document, select Insert > Chart and then choose the type of chart to insert. When you do that, the chart appears in your document with placeholder data, and a pop-up window appears that looks like a mini Excel spreadsheet. Enter or edit the data, or else click the Edit in Excel button to open it up in Excel and edit it there.
 IDG
IDG
When you insert a chart, a window where you can edit the data pops up. (Click image to enlarge it.)
Note that the Pareto chart does not show up when you select Insert > Chart. To insert one, select Insert > Chart, select Histogram, and at the top of the screen that appears, select the option to the right, Pareto.
Review or restore earlier versions of a document
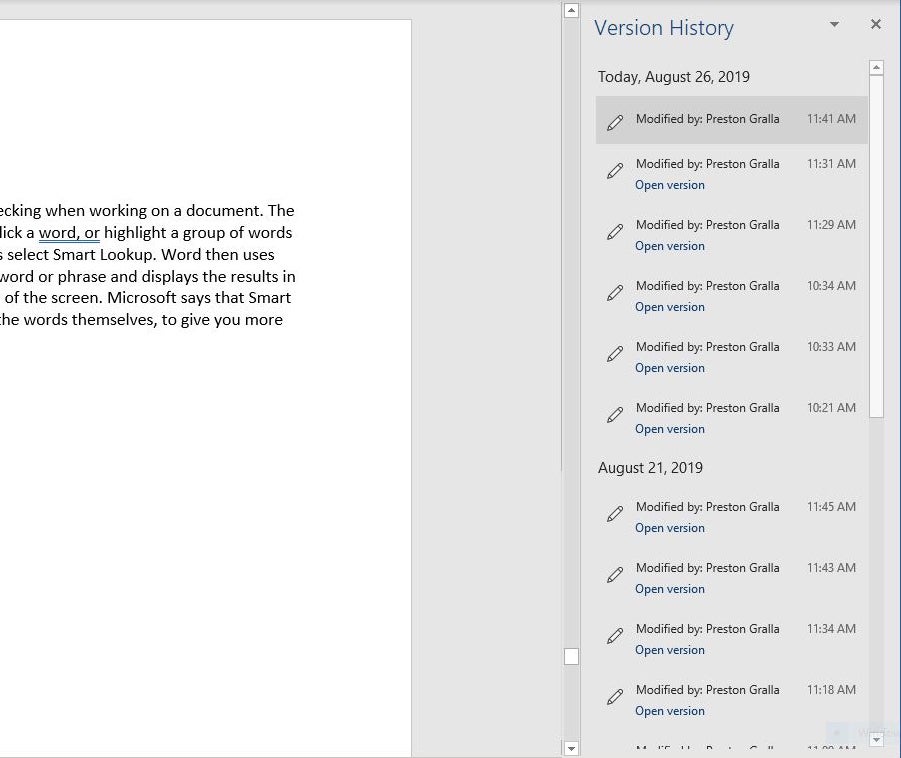
There’s an extremely useful feature hiding in the title bar in Word for Office 365: You can use Version History to go back to previous versions of a file, review them, compare them side-by-side with your existing version, and copy and paste from an older file to your existing one. You can also restore an entire old version.
To do it, click the file name at the top of the screen in an open file. A drop-down menu appears. Click Version History, and the Version History pane appears on the right side of the screen with a list of the previous versions of the file, including the time and date they were saved. (Alternatively, you can select the File tab on the Ribbon, then click the Version History button.)
 IDG
IDG
Use Version History to see all previous versions of a document, copy and paste from an older file to your existing one, or restore an entire old version. (Click image to enlarge it.)
In the Version History pane, click “Open version” under any older version, and that version appears as a read-only version in a new window. Scroll through the version and copy any content you want, then paste it into the latest version of the file. To restore the old version, overwriting the current one, click the Restore button at the top of the editing window.
Use AutoSave to provide a safety net as you work
If you’re worried that you’ll lose your work on a document because you don’t constantly save it, you’ll welcome the AutoSave feature. It automatically saves your files for you, so you won’t have to worry about system crashes, power outages, Word crashes and similar problems. It only works only on .docx documents stored in OneDrive, OneDrive for Business, or SharePoint Online. It won’t work with files saved in Word’s older .doc format or files you save to your hard drive.
AutoSave is a vast improvement over the previous the AutoRecover feature built into Word. AutoRecover doesn’t save your files in real time; instead, every several minutes it saves an AutoRecover file that you can try to recover after a crash. It doesn’t always work, though – for example, if you don’t properly open Word after the crash, or if the crash doesn’t meet Microsoft’s definition of a crash. In addition, Microsoft notes, “AutoRecover is only effective for unplanned disruptions, such as a power outage or a crash. AutoRecover files are not designed to be saved when a logoff is scheduled or an orderly shutdown occurs.” And the files aren’t saved in real time, so you’ll likely lose several minutes of work even if all goes as planned.
AutoSave is turned on by default in Word for Office 365 .docx files stored in OneDrive, OneDrive for Business, or SharePoint Online. To turn it off (or back on again) for a workbook, use the AutoSave button on the top left of the screen. If you want AutoSave to be off for all files by default, select File > Options > Save and uncheck the box marked “AutoSave OneDrive and SharePoint Online files by default on Word.”
Using AutoSave may require some rethinking of your workflow. Many people are used to creating new documents based on existing ones by opening the existing file, making changes to it, and then using Save As to save the new version under a different name, leaving the original file intact. Be warned that doing this with AutoSave enabled will save your changes in the original file. Instead, Microsoft suggests opening the original file and immediately selecting File > Save a Copy (which replaces Save As when AutoSave is enabled) to create a new version.
If AutoSave does save unwanted changes to a file, you can always use the Version History feature described above to roll back to an earlier version.
Other new features worth checking out
Two other recently introduced features may prove useful for some business users:
Focus mode
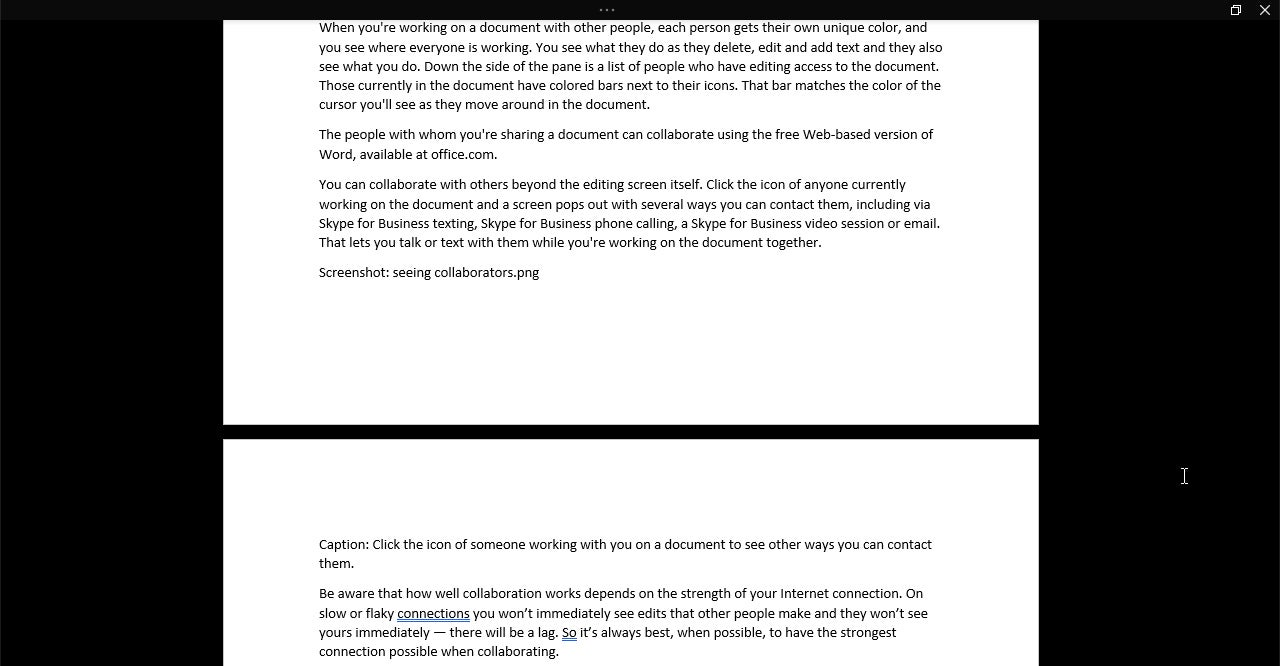
If you’re the kind of person who needs help focusing on the work at hand, you’ll be pleased at Word’s Focus mode. When you put Word into Focus mode, the Ribbon and all toolbars are hidden, and all parts of you screen that aren’t Word turn black. So you’ll find no distractions at all.
To put Word into Focus mode, choose View > Focus (the Focus button is in the Immersive group near the left end of the Ribbon) or press Alt-W, then O. To get out of Focus mode, press the Esc key. When you’re in Focus mode, if you want the Ribbon to appear (with white text and icons against a black background), move your cursor to the top of the screen. Press Esc or start typing in Word to make the Ribbon go away.
 IDG
IDG
Focus mode helps you block out distractions when you’re working on a document. (Click image to enlarge it.)
Create a Sway web page from a document
If you’re one of the few people who uses Microsoft’s Sway app, which lets you easily create simple, web-based presentations, you’ll want to try out a feature that lets you create a Sway page from a Word document.
To do it, select File > Transform. The Transform to Web Page pane appears. Select a style in the pane, then click the Transform button. A web page is created on the web and opened in the Sway app in your browser. To share it with others, select the Share button on the Sway page and follow the instructions.
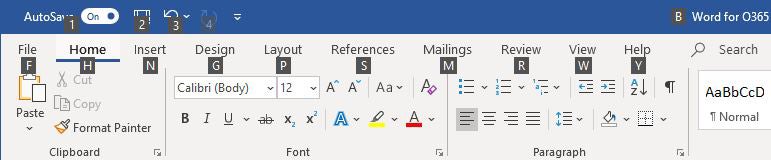
Handy keyboard shortcuts
Using keyboard shortcuts is one of the best ways to accomplish tasks quickly in Word. You can even use them to navigate the Ribbon. For instance, Alt-H takes you to the Home tab, and Alt-G takes you to the Design tab. (For help finding specific commands on the Ribbon, see our Word for Office 365 Ribbon quick reference.)
 IDG
IDG
Using the Alt key helps you master the Ribbon shortcuts. (Click image to enlarge it.)
But there are many other keyboard shortcuts to help you accomplish a vast array of tasks in Word. We've listed the ones we've found the most useful below. For even more shortcuts, see Microsoft's Office site.
Useful Word for Office 365 (in Windows) keyboard shortcuts
Don't forget to download our Word for Office 365 Ribbon quick reference!