USB-C explained: How to get the most from it (and why it's great)
- 29 March, 2018 03:11

You’ve probably noticed something strange about the latest phones, tablets and laptops at your company: The familiar rectangular Type-A USB ports are gone, replaced by smaller oblong connectors. Welcome to the USB-C era of business computing. While iPhones and iPads stick with Apple’s proprietary Lightning connector, USB-C is now part and parcel of most laptops, phones and tablets made today. Even the latest MacBooks have a USB-C port.
What is USB-C?
USB Type-C, usually referred to as just USB-C, is a relatively new type of connector for delivering data and power to and from computing devices. Because the USB-C plug is symmetrical, it can be inserted either way, eliminating the frustrations of earlier USB ports and putting it on a par with Apple’s reversible Lightning plug. This alone makes it a hit for me, but USB-C is also closely linked to several powerful new technologies, including USB 3.1, Thunderbolt 3, and USB Power Delivery.
Most USB-C ports are built on the USB 3.1 data-transfer standard. The second-generation protocol of USB 3.1 can theoretically deliver data speeds of up to 10Gbps — twice as fast as USB 3.0 and first-gen USB 3.1, which both top out at 5Gbps. (Look for devices that say “USB 3.1 Rev 2,” “USB 3.1 Gen 2,” “SuperSpeed USB 10Gbps” or “SuperSpeed+” to get support for the faster spec.)
And on many laptops and desktops, the USB-C specification also supports Intel’s Thunderbolt 3 data-transfer technology. A USB-C port equipped with Thunderbolt 3 can push data speeds to a theoretical limit of 40Gbps. To show how far we’ve come, that’s four times faster than USB 3.1 and more than 3,000 times faster than the original USB 1 spec of 12Mbps.
 Melissa Riofrio/IDG
The Type-C USB port (second from left) on this Acer laptop is noticeably smaller than the two older Type-A USB ports to its right.
With increased data-transfer speeds comes the ability to push video over the same connection. USB-C’s Alternate Mode (or “Alt Mode”) for video enables adapters to output video from that same USB-C port to HDMI, DisplayPort, VGA and other types of video connectors on displays, TVs and projectors.
What’s more, USB-C supports the USB Power Delivery (USB PD) specification. A USB 2.0 port can deliver just 2.5 watts of power, about enough to charge a phone. USB 3.1 ups this figure to about 15 watts. But USB PD can deliver up to 100 watts of power, more than six times what USB 3.1 can. This opens up the potential for laptop-powered projectors based on USB-C.
All that said, you’ll need to make some changes and buy some accessories to take full advantage of the new port. This guide can help ease the transition by showing what you can do with USB-C and what you’ll need to make it work.
Be careful, though, because not all USB-C devices support all of the latest USB-C specs. For instance, just about every USB-C flash drive supports the earlier Rev 1 protocol, a lot of tablets and phones don’t support Alt Mode video, and we are in the early days of USB Power Delivery, with few devices going beyond 40 or 60 watts. In other words, read the spec sheet carefully so you know what you’re getting before you buy.
The following tools and tips can be used with laptops, tablets and phones with USB-C ports. Before you know it, using USB-C will seem like second nature.
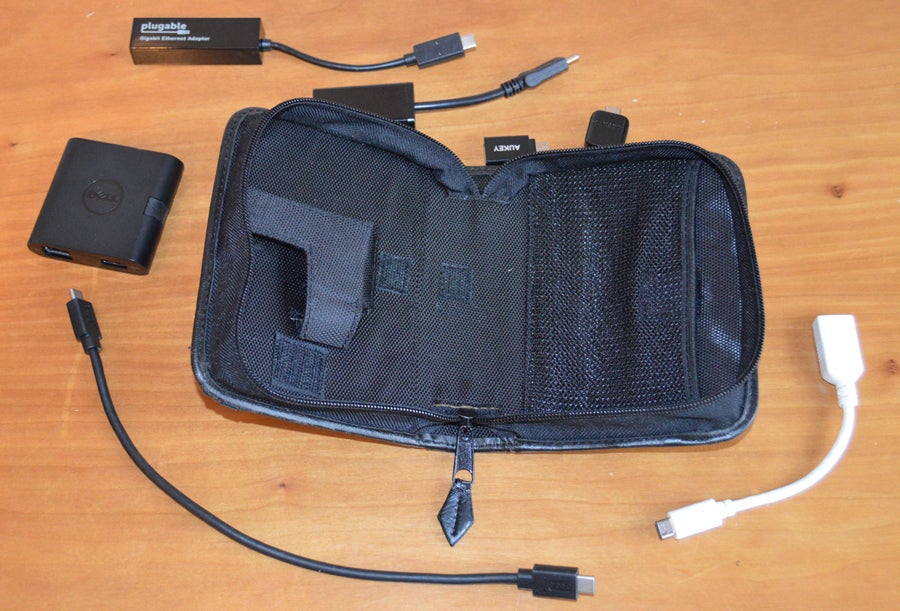
Make a USB-C travel kit
The good news is that USB-C ports can be used with most older USB 2, 3.0 and 3.1 accessories. The bad news is that you’ll need the right adapters and cables. I’ve made my own USB-C survival kit that has six key cables and adapters inside an old zippered case. Here’s what it contains:
- Two small male USB-C to female USB 3.0/3.1 adapters for connecting to older devices, such as flash drives.
- A USB-C male-to-male cable for using accessories.
- A USB-C Ethernet adapter for when I can get a wired connection.
- An HDMI converter for projector-based presentations.
- A hub that consolidates the most useful ports. There are many USB-C hubs available, but I pack Dell’s $60 DA200 because it’s small and fits into the case’s pocket. It has USB 3.1, Ethernet, VGA and HDMI ports and can deliver up to 2048 x 1152-resolution video.
 Brian Nadel / IDG
A compact USB-C travel kit with a variety of adapters comes in mighty handy on the road.
Take your data with you
There’s no shortage of USB-C flash drives for those who like to carry their data with them. The best part is that all you do is insert the drive, and after it is assigned a drive letter, its capacity is available. However, most USB-C drives still rely on older USB 3.1 Rev 1 hardware. That means that while they are a step up from earlier flash drives, they are not fully using the abilities of the current USB-C protocol.
These micro drives come in all shapes and sizes, but my favorite is the SanDisk Ultra Dual Drive because there are models that can store up to 256GB, and its switchblade-like tab lets you flip between a USB-C plug and a Type-A USB 3.0 one. It’ll set you back anywhere from $13 to $80, depending on capacity. On the downside, it still uses the older USB 3.1 Rev 1 spec and can only muster 150Mbps data speeds, according to the company.
 SanDisk
SanDisk’s Ultra Dual Drive offers both a Type-C USB 3.1 plug and a Type-A USB 3.0 one.
Another approach is a large-capacity external drive, like Samsung’s Portable SSD T5. Available in capacities ranging from 250GB to 2TB (at prices from $125 to $740), it’s physically smaller than most external drives and is for data hoarders who can’t seem to delete anything. Happily, it relies on the USB 3.1 Rev 2 specification and moves up to 4.3Gbps, according to Samsung.
 Samsung
Samsung's T5 SSD uses USB-C with second-gen USB 3.1 technology for fast data transfer.
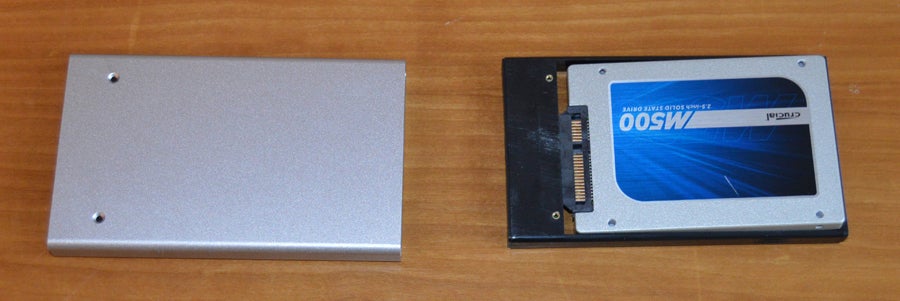
There’s a cheaper way: make one yourself. I did this with a $35 Satechi Aluminum Type-C HDD/SSD Enclosure and a 500GB SSD drive cannibalized from a broken laptop. Here’s how.
- Remove the drive from the old laptop.
- Unscrew and pull off the enclosure’s cover.
- Insert the drive into the enclosure’s SATA connector, making sure it seats properly.
 Brian Nadel / IDG
Make sure the SSD is seated properly before sliding the enclosure’s cover back on.
- Slide the case’s cover into place and screw it in.
- Using a male-to-male USB-C cable, plug the drive into a computer.
- After the system recognizes the drive, you’ll probably want to remove its old data by formatting it.
Set up a dock
There’s nothing that says “welcome home” like a docking station on your desk to connect your laptop — and in some cases even a tablet or phone — to your network, display(s), external drives and other peripheral devices while charging the system. Today, choices abound.
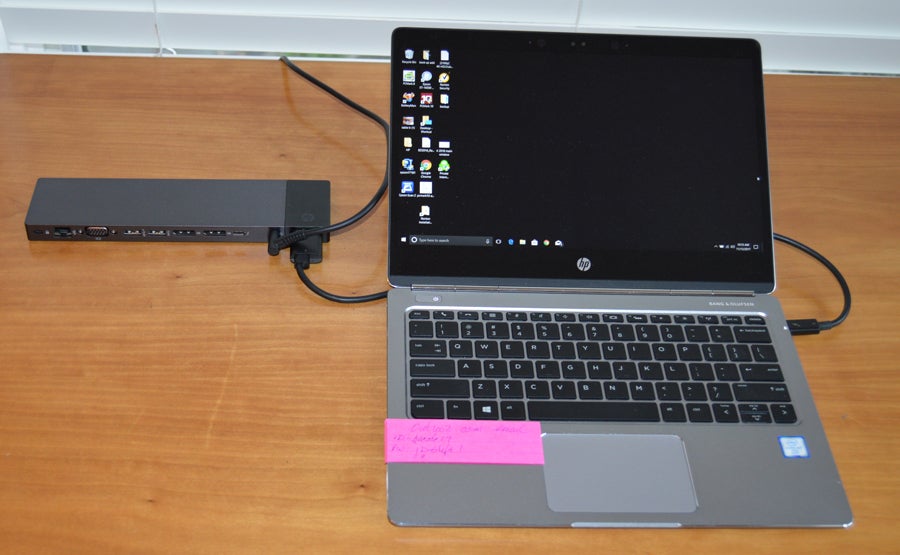
Approach 1: Get a dedicated dock for your laptop
To start, there are docks dedicated to specific devices, such as the HP Elite 90W Thunderbolt 3 Dock that works with my HP EliteBook Folio G1 laptop. The horizontal device costs $209 and uses USB-C’s Alternate Mode for video via a USB-C cable to the dock and then DisplayPort or VGA to the screens. It can drive up to three displays for a panoramic view of my work. It also has a USB-C port that can use the high-speed Thunderbolt 3 format, an Ethernet port, connectors for four USB 3/3.1 devices and an audio-out jack.
 Brian Nadel / IDG
This HP Thunderbolt 3 dock is made for my HP laptop.
For all it can do, the setup is surprisingly easy.
- Before you do anything, make sure the dock has the latest firmware.
- Plug the dock’s power adapter in.
- Connect the proprietary wide USB-C plug between the dock and the computer. It separately carries data and power.
- Turn the dock’s power switch on; its white LED should light up.
- The PC should recognize and load the dock’s software.
- The computer and dock now act as one and work with displays, drives, networks and headphones.
Approach 2: Go generic
A more generic approach is getting a universal dock that works with a variety of laptops, such as Plugable’s $179 UD-ULTCDL Triple Display Docking Station. In addition to two HDMI ports and a DVI port for video, the vertical dock has a USB-C port, four USB 3.0 ports, an Ethernet jack, and microphone and headphone jacks.
Like the HP dock, this one can use USB-C’s Alternate Mode for video that runs through the USB-C cable to the dock and then via DVI or HDMI to the screen. The dock also supports DisplayLink technology, which tops out at 2560 x 1440-pixel resolution, but you’ll need to install software to use it.
Supporting both Alt Mode and DisplayLink adds flexibility, allowing the Plugable dock to work with just about any USB-C laptop, tablet or phone, including recent MacBooks. While DisplayLink uses a heavily compressed signal and is more limited in the range of resolutions and depth of color offered, in some cases, as with Google’s Pixel and XL phones, it’s your only option. Best bet: consult the compatibility chart on the dock’s site.
 Brian Nadel / IDG
Setting up the Plugable USB-C Triple Display Docking Station.
I set it up with my Samsung Tab Pro S, a tablet that has a single USB-C port and no dedicated docking station. Here’s how to use the DisplayLink software. If you want to use USB-C’s Alt Mode video, skip step 2.
- Start by plugging the dock’s power adapter into an outlet; the blue LED up front should glow.
- Download and install the DisplayLink software.
- When it’s done, use the included USB-C cable to connect the Host port on the dock with the computer. A green LED lights up.
- The system is now charging. In my tests, it connected successfully to an LG projector, a gigabit network and an external drive.
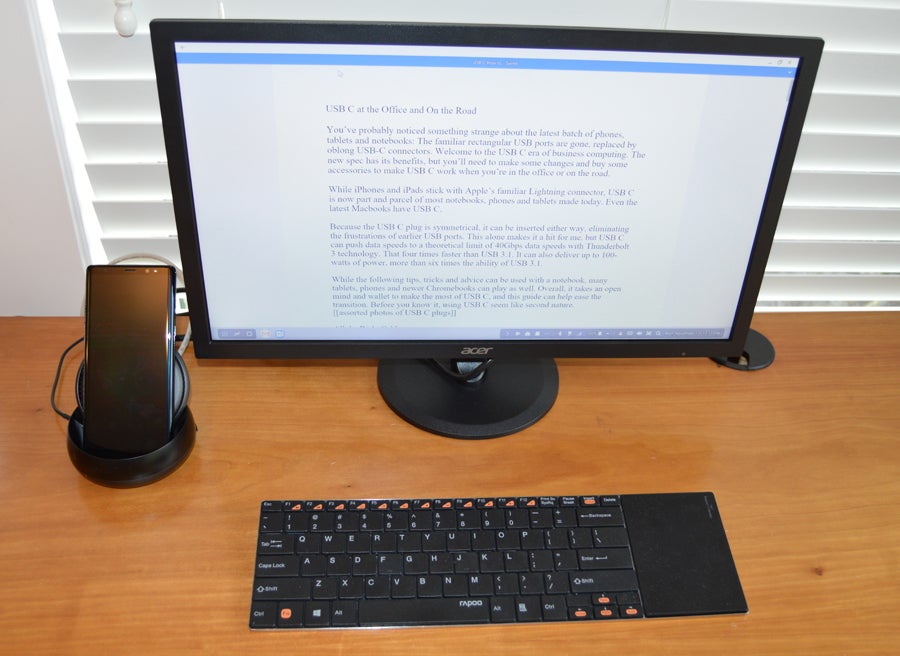
Approach 3: The DeX for select Samsung phones
If you ever wanted to ditch the laptop and truly travel light, now’s your chance. Samsung’s $120 DeX Station (and the newer Dex Pad) can transform your Galaxy S9, S8 or Note 8 phone into a powerful desktop system.
The dock charges your phone and includes an HDMI port, a USB-C port, a USB 2.0 port and an Ethernet port. I tested it with a Galaxy Note 8. Here’s how to use it:
- Start by flipping open the clamshell DeX and plugging it into the included USB-C power adapter.
- Connect your external monitor to the HDMI port; I used a 21-in. Acer display.
- Plug the Ethernet connector into your network; you can also use the phone’s Wi-Fi networking abilities.
- Plug your keyboard and a mouse into the USB ports. I used a Rapoo E9180 Wireless Touchpad Keyboard that leaves a USB port open.
- There’s no audio jack, so I connected the DeX to a Logitech Mini Boombox Bluetooth speaker; its microphone turns it into a speakerphone.
- Slide the phone into the dock’s USB-C plug. It takes a little finesse, but I soon got the hang of it.
- After the phone connects, the display shows the DeX logo, followed by what’s on the phone’s screen.
 Brian Nadel / IDG
A Note 8 phone + the DeX + the Microsoft Word Android app feels just like using a desktop PC.
The DeX works with most Android apps, but they show up vertically and can’t run full screen. A handful of programs, like Word, Excel and PowerPoint, have been adapted to take advantage of the DeX and fill the screen in landscape mode. While using them, it feels just like a laptop or desktop computer, but it’s all happening on a phone.
Make a power play
USB-C’s support for the USB PD specification is a huge step forward for charging your devices. Instead of being limited to 2.5 watts like USB 2.0 or about 15 watts like USB 3.1, USB PD can dole out up to about 100 watts at 20 volts, easily enough to charge a laptop and more. That means that a portable USB-C charger equipped with USB PD technology can keep your laptop and mobile devices juiced up and ready to go at all times.
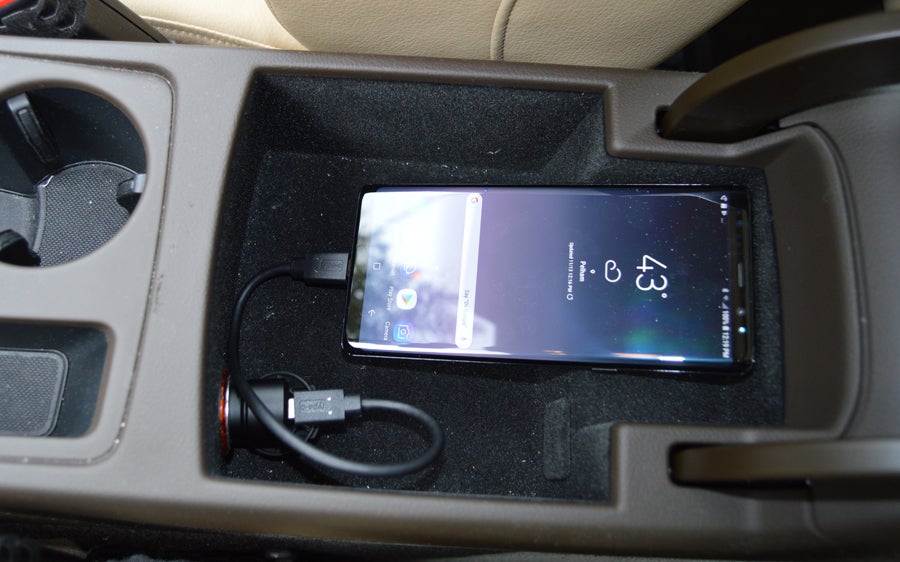
I spend a lot of time working out of my car, and I keep a $10 RavPower 24-watt Car Charger plugged into the cigarette lighter outlet in the compartment between the front seats. In addition to a traditional USB 3 port, it has a USB-C power port for charging my Note 8 phone or Tab Pro S. A powerful travel companion, it weighs less than an ounce but can dole out up to a total of 4.8 amps. The adapter’s LEDs glow blue when it’s working.
 Brian Nadel / IDG
RavPower’s USB-C car charger takes advantage of USB Power Delivery to charge devices.
When I’m not driving, I take Anker’s PowerCore+ 26800 PD battery pack with me to keep my devices charged. No lightweight, it tips the scales at 1.3 lbs. and has a 26.8 amp-hour lithium battery pack inside. It costs $74 on its own, but I got the $87 package that includes an AC adapter for quickly charging its cells. When it’s fully charged, the circular charge indicator’s 10 LEDs glow. They flash when there’s less than 10% left.
The PowerCore+ offers a pair of USB 3 ports and a USB-C port. Plug it into a laptop, phone or tablet, and the system’s battery icon shows that it’s charging. The PowerCore+ powered my Tab Pro S tablet for an extra 9 hours of work on top of the 4 hours I usually get with the system’s internal battery — enough for a flight to Asia or a day spent working in coffee shops and office lobbies.
 Anker
Anker
Anker’s PowerCore+ battery pack supports both USB PD and Quick Charge 3 technology.
For me the bonus is that the PowerCore+ battery uses Qualcomm’s Quick Charge 3 technology to optimize the power flow for the device. It charged my Note 8 phone in 92 minutes, more than half an hour faster than with a RavPower RP-P819 battery pack, which lacks Quick Charge 3.
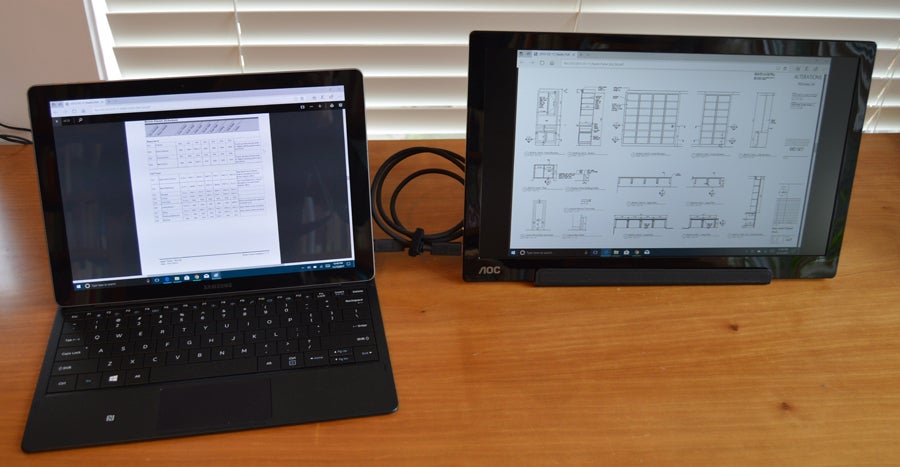
Drive a display
USB-C’s combination of faster data transfer and increased power delivery opens the way for a new class of devices that take advantage of both. For example, AOC's I1601FWUX 15.6-in. display brings together several of the most interesting aspects of USB-C. At 9.3 x 14.8 x 0.4 in. and weighing 1.8 lb., the portable monitor lets you say buh-bye to HDMI or VGA cables, because its USB-C cable carries both power and video.
The $250 display uses Alt Mode video, and, according to the company, works with Windows 7, 8, or 10 and macOS 10.12.1 or later. It also worked with my Android-based Samsung Tab Pro S tablet and Galaxy S8 phone, but that’s undocumented by AOC. After you plug it into a notebook, tablet or phone, the I1601FWUX can mirror or extend what’s on-screen. However, it’s limited to showing 262,000 colors in 1920 x 1080 resolution.
The I1601FWUX has its own settings for brightness, contrast and more, but the single-button interface is tricky. To set up the display:
- Use the included USB-C cable and connect the screen to the computer.
- Press and hold the power button to turn it on.
- Once the display is lit, press the power button briefly to bring up the on-screen menu choices along the screen’s bottom.
- Press the button once quickly to advance through each menu choice: Brightness, Contrast, OverDrive (response time), Low Blue Light and Language.
- Once you’re in a menu you’d like to adjust, such as Brightness, wait a moment and then press the button repeatedly to increase the setting by increments; unfortunately, if you miss your target, you have to go all the way around again.
- Advance to Exit to save the setting.
 Brian Nadel / IDG
AOC’s portable USB-C display includes its own stand and doesn’t need to be plugged into a wall outlet.
The display’s cover doubles as a stand for portrait or landscape viewing, and the image automatically changes orientation as you turn the screen. Its ability to operate off-the-grid, like at a construction site, makes the I1601FWUX both unusual and useful. I used the external display to view construction plans while going over the project’s specs on the Tab Pro S’s native display.
On the downside, using the AOC display without plugging it into a wall socket will drain your device’s battery. With the display set to 60% brightness, the battery life of my Tab Pro S dropped by a little over one hour to 2 hours, 45 minutes, according to FutureMark’s PC Mark 10’s Work Conventional Battery Test.
An excellent complement to a laptop, tablet, or phone for small group presentations, demos or just desk work, the I1601FWUX points the way for a generation of self-powered devices, such as bigger and, I hope, interactive displays as well as projectors. But, as with everything else concerning USB-C, I guess I’ll just have to be patient until such devices arrive on the market.